Briefs
"Look, feel and creation of a working waterwheel 3D model for Whitchurch Silk Mill to contain information and visuals pertaining to the working 1890’s waterwheel." AND "Look, feel and creation of a 3D loom for Whitchurch Silk Mill to contain information and visuals pertaining to the operation of a loom, provided by Whitchurch Silk Mill."
Overview
As part of my second semester of my second year, I was provided with a set of briefs from an organisation called ‘Whitchurch Silk Mill’. After deep consideration, my group and I decided to choose to undertake two briefs which were then combined to produce one final outcome. These briefs entailed creating interactive 3D models to both demonstrate and explain how the loom and waterwheel operated at ‘Whitchurch Silk Mill’. For the final outcome, this was presented in the form of a miniature website so that the clients could have used the project on tablet devices as well as being able to include this on their website if required. The miniature website included an introduction page, a 3D loom page and a 3D waterwheel page with the latter including a quiz, acting as an interactive product to be used both internally and externally.
During the summer period after the semester, I was contacted by one of the clients at ‘Whitchurch Silk Mill’, asking if they could have used the project my group and I had created. I then explained that some refinements would have needed to have been first completed of which I then undertook the task of fully finishing the project during the summer period, ensuring it was of a high quality for the clients to use at ‘Whitchurch Silk Mill’.
All of the processes for this project will be viewable on this page.
For a more detailed process, I have included documents where appropriate.
Before Deciding on a Brief
Overview
Before deciding on a brief, I decided to undertake a few small tasks in preparation for when the client visited our lecture in week two of the semester. This included gaining some background research, preparing questions and thinking of methods of how development could have been implemented into the 3D projects shown above as this was something that the group was interested in. I also thought of some ideas of how the current website could have been improved if the client would be willing for a redesign of the website as a project alternative.
The Undertaken Tasks
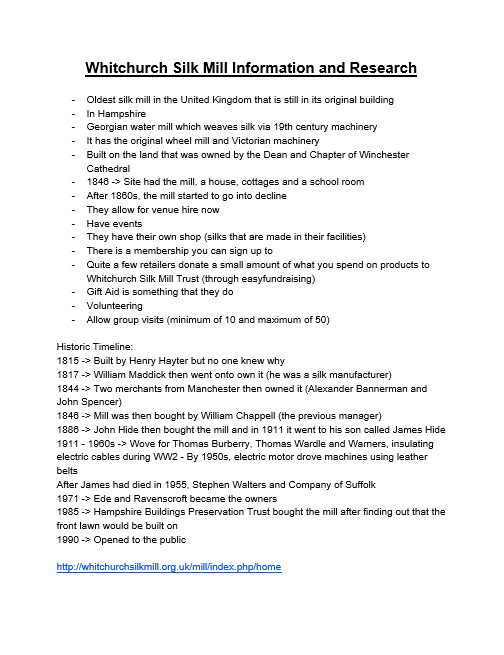
'Whitchurch Silk Mill' Background Research
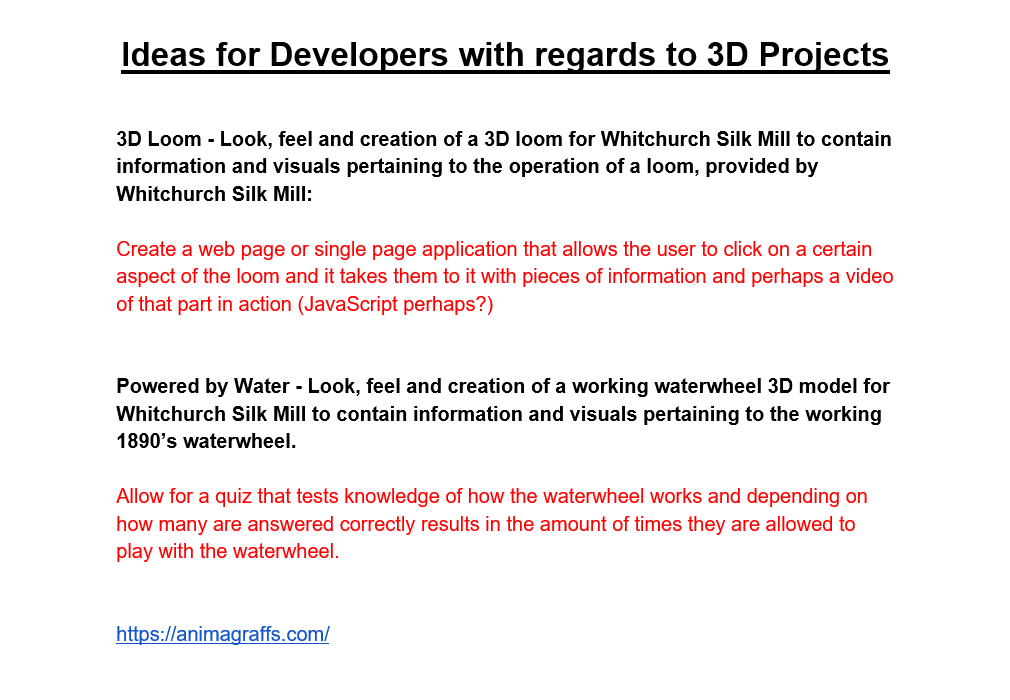
Development Ideas for the 3D Projects
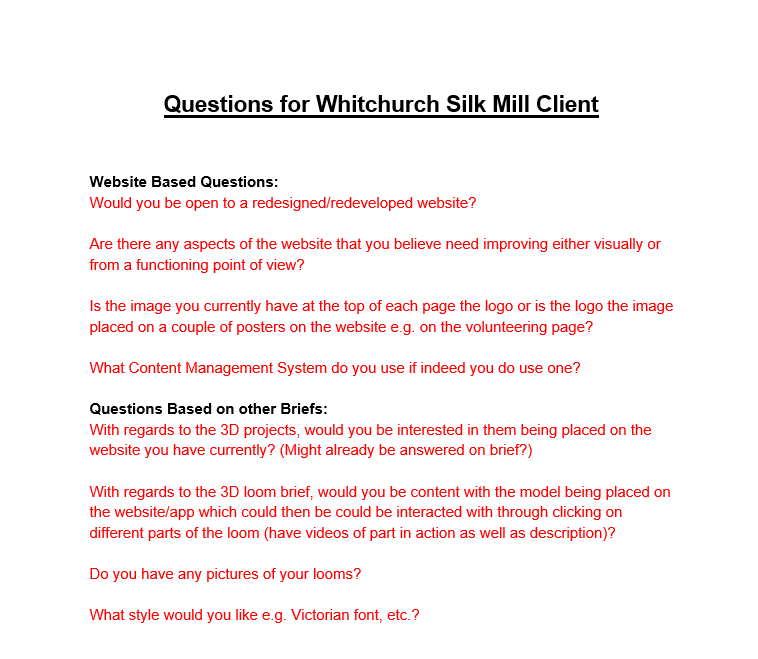
Created Questions for 'Whitchurch Silk Mill'
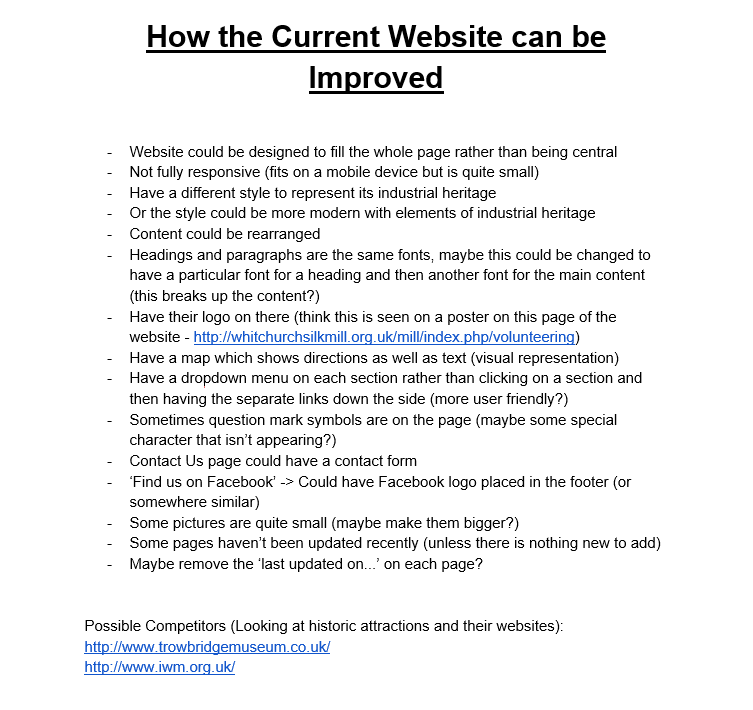
Possible Improvements to the Current 'Whitchurch Silk Mill' Website
Initial Research and Inspiration
Overview
After realising that the website was currently in the process of being updated, the group decided to choose the two 3D projects which involved creating 3D models for both a loom and waterwheel. I decided to first of all undertake research to understand products which already existed with regards to 3D models and activities. These can be viewed below. Throughout the project(s), I ensured that I considered a variety of target audiences as, for both projects, these included audiences such as schools and professional academics which meant that the outcomes had to be usable by different age ranges.
Current Existing Products
Overview
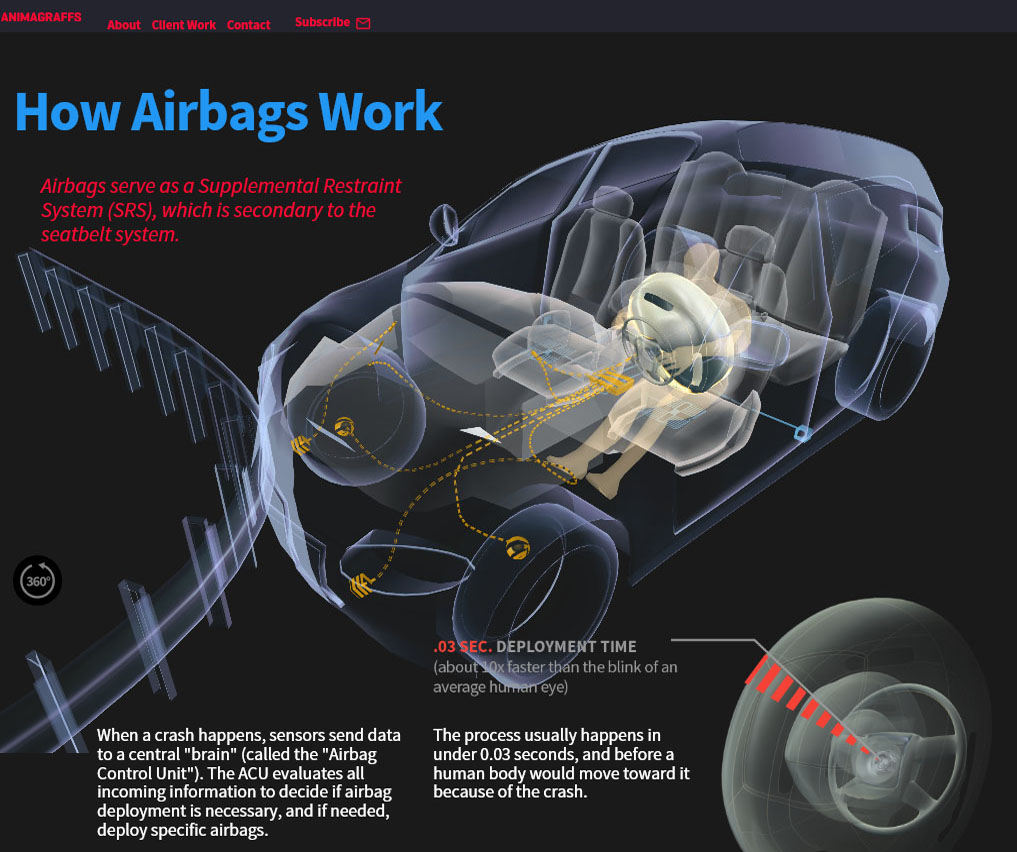
As will be evident below, there were many examples which demonstrated how a user could have interacted with 3D models online. I understood that with regards to the 3D models from both 'Sketchfab' and 'Animagraffs', these could have been rotated and that information was also provided to help explain the processes being shown. With regards to the jigsaw research, this was to understand how the user would have been able to have dragged and dropped pieces of a puzzle into place. From personal experience, there was an activity where the user would have been assigned the task of completing a puzzle to put different parts of a train together under a time limit in a specific order and this was digital. This was relating to the 'STEAM Museum' as shown below.
The Collected Research
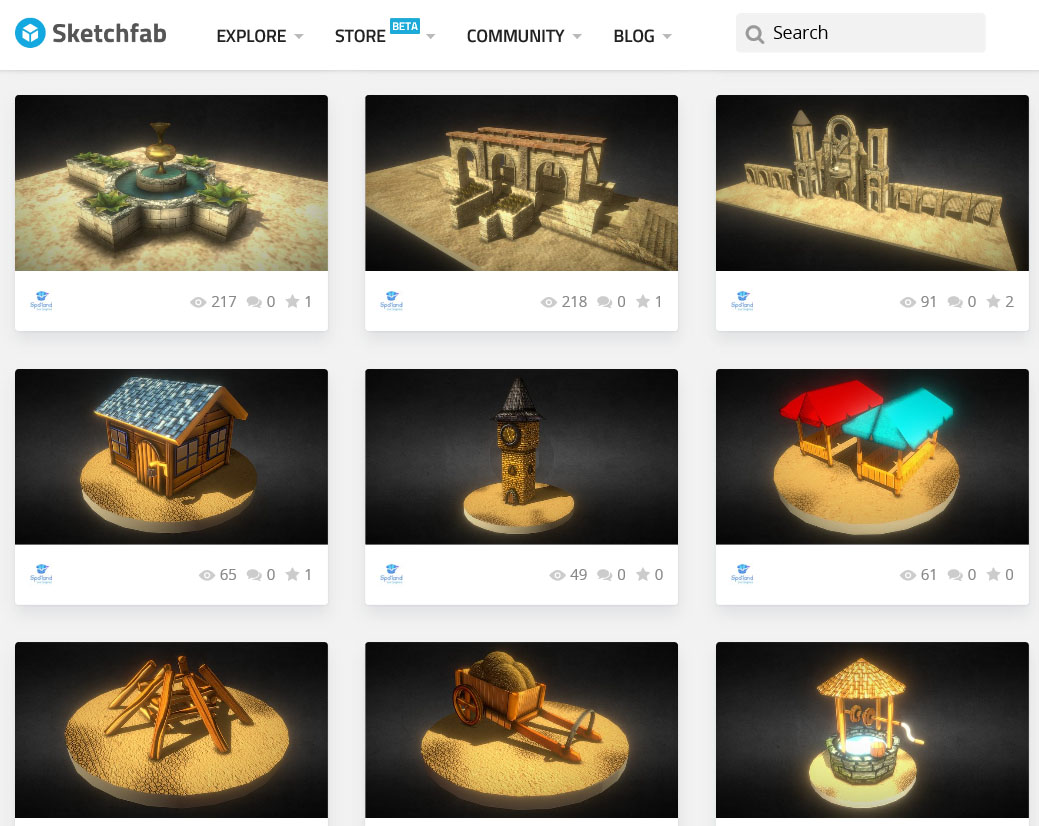
A List of 3D Models on the 'Sketchfab' Website
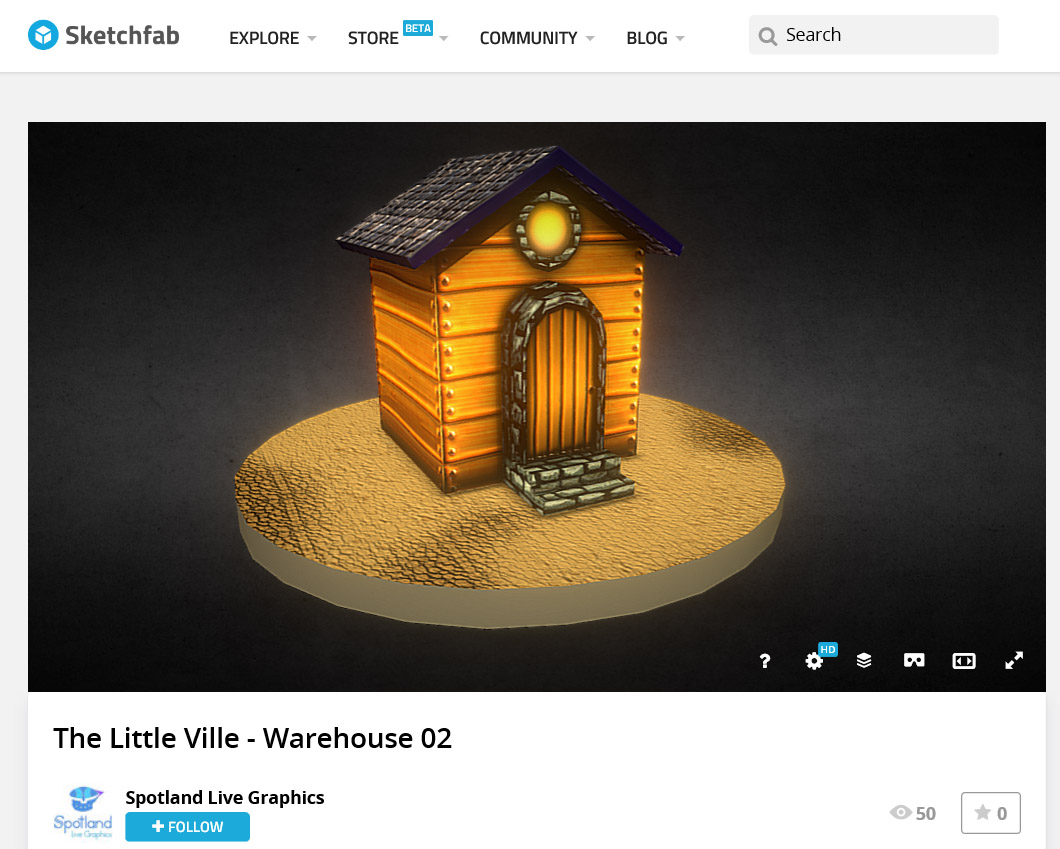
One Example of an Interactive 3D Model on the 'Sketchfab' Website

One Example of an Interactive 3D Model on the 'Animagraffs' Website
Another Example of an Interactive 3D Model on the 'Animagraffs' Website
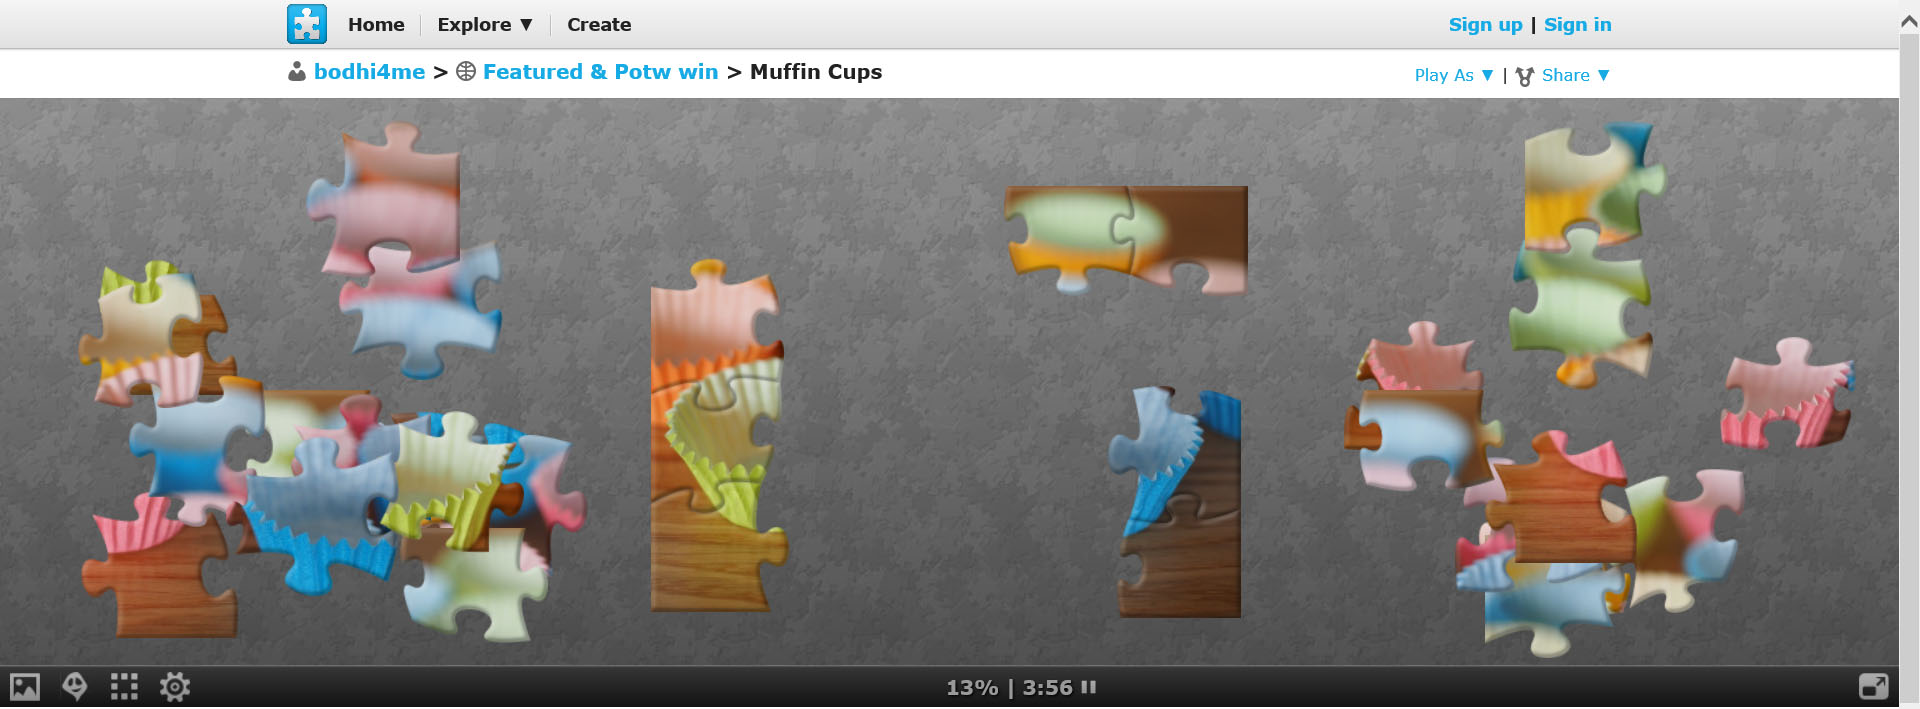
Jigsaw Game Research
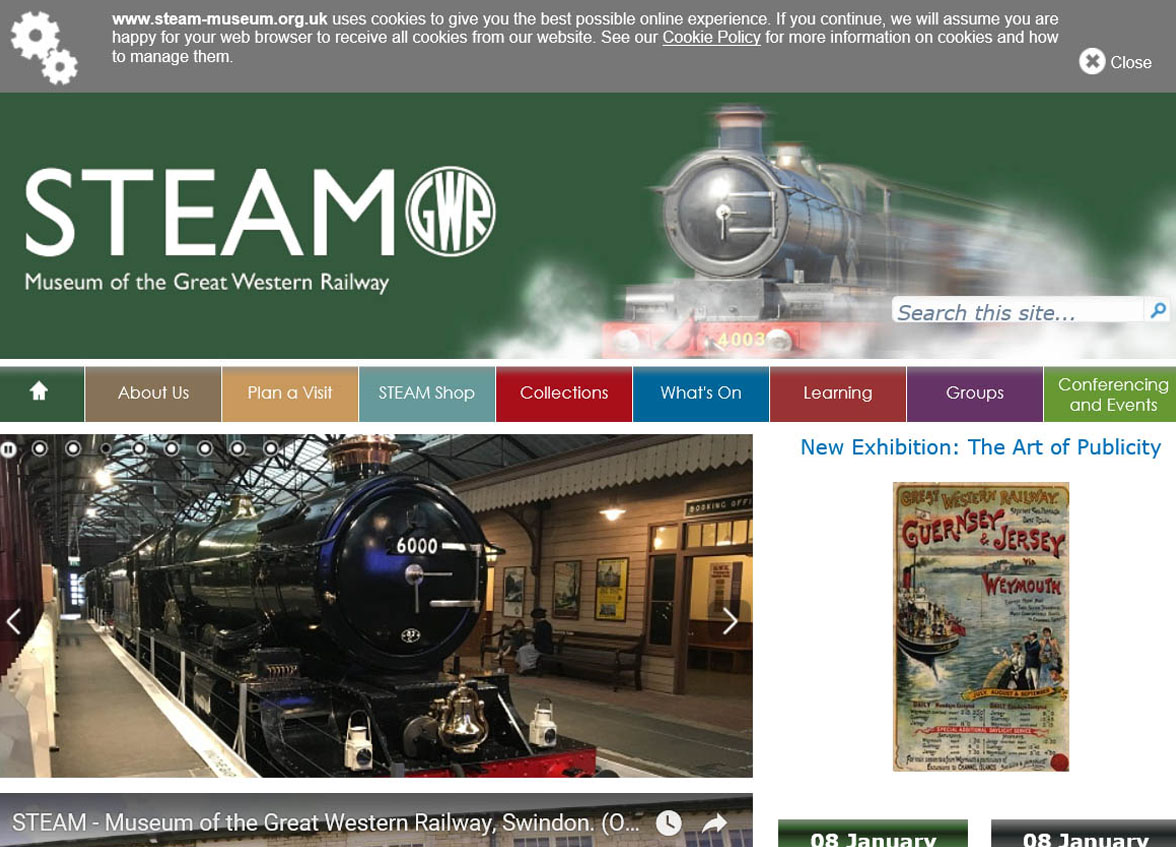
The 'STEAM Museum' Website with Regards to the Puzzle Explained Above
Research of Current Technologies
Overview
As well as researching current examples of outcomes, I also researched the types of technologies which could have been used to allow for interaction with 3D objects. 'WebGL' was a good example of this and a few examples of this can be viewed below.
The first example below allowed the user to type the quantity of jelly fish that they would have wanted to appear on the web page. This then would have created this number of jelly fish on the web page. The second example below was a Rubik's cube which allowed the user to interact with it and the final example below allowed the user to select a car type and a colour which would then have appeared on the web page. The car would have rotated allowing for viewing of different angles.
The Collected Research
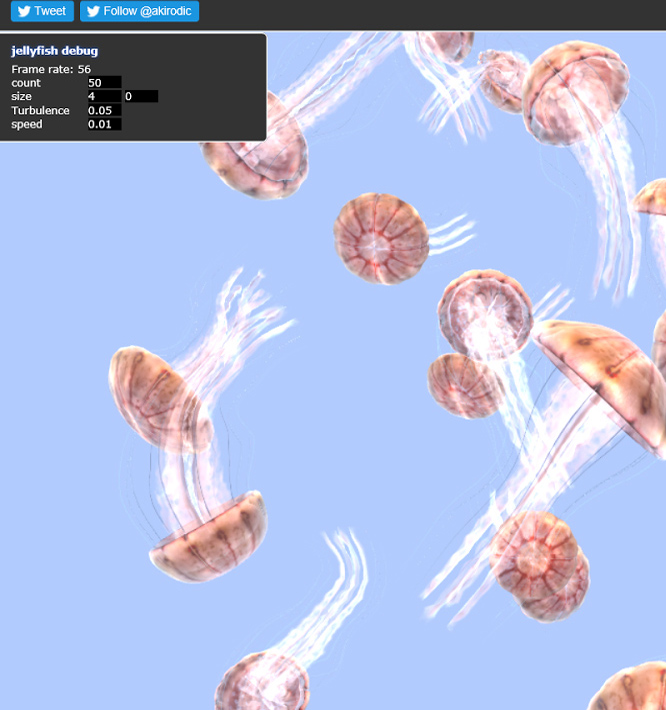
Technologies Research 1 - Jelly Fish
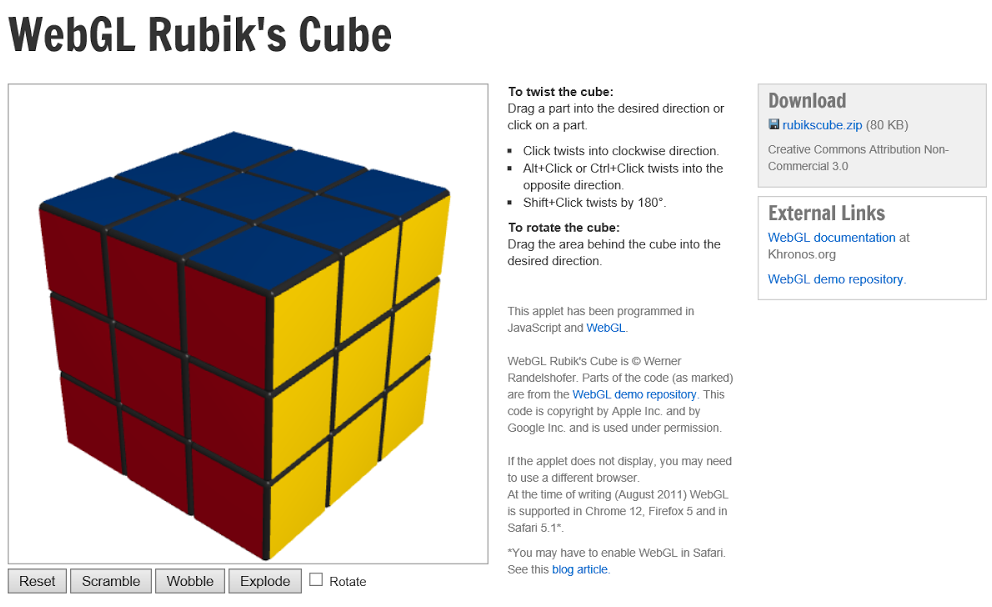
Technologies Research 2 - 'WebGL' Rubik's Cube
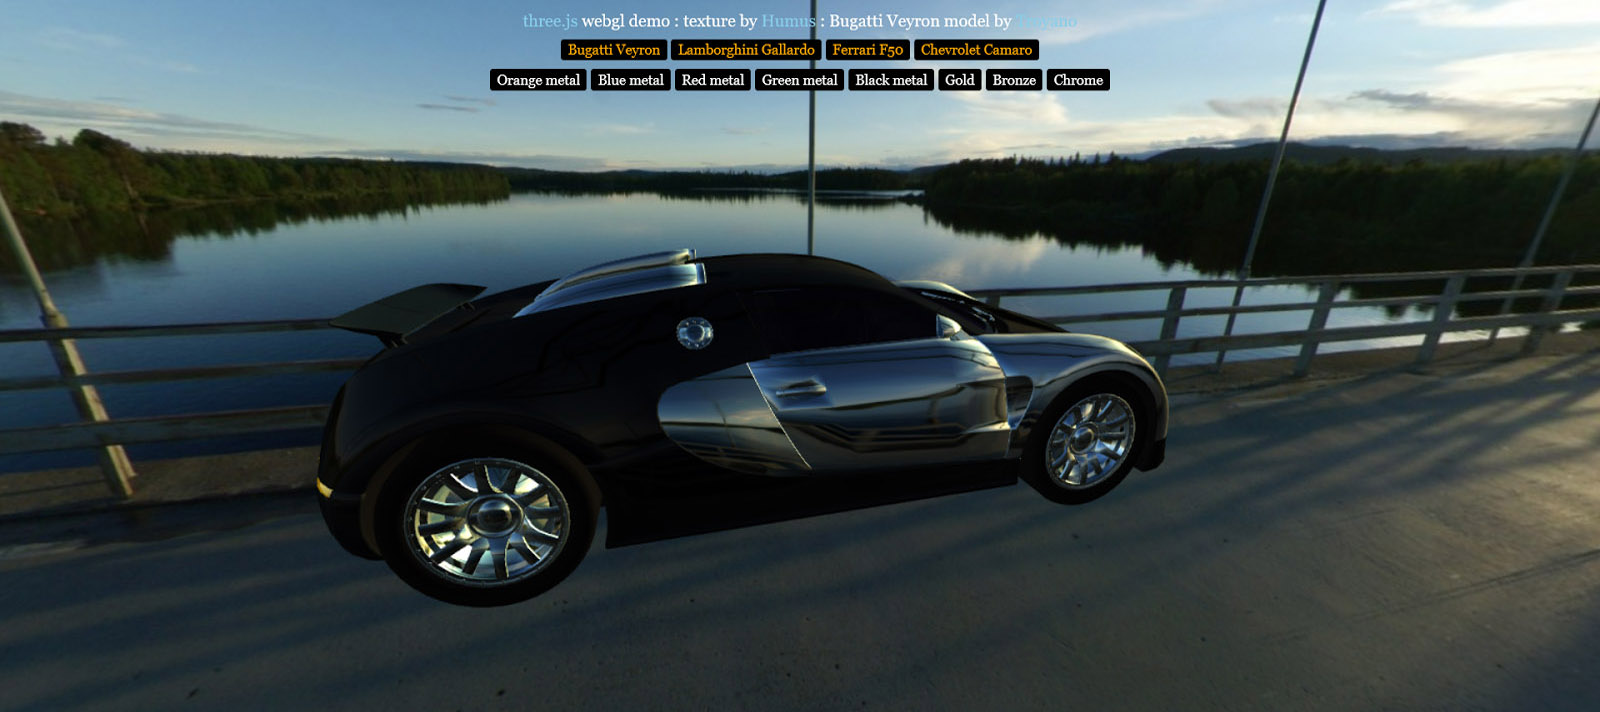
Technologies Research 3 - Car Customisations
Initial Ideas for Both Briefs with the Inspiration for the Ideas
3D Loom Brief
Overview
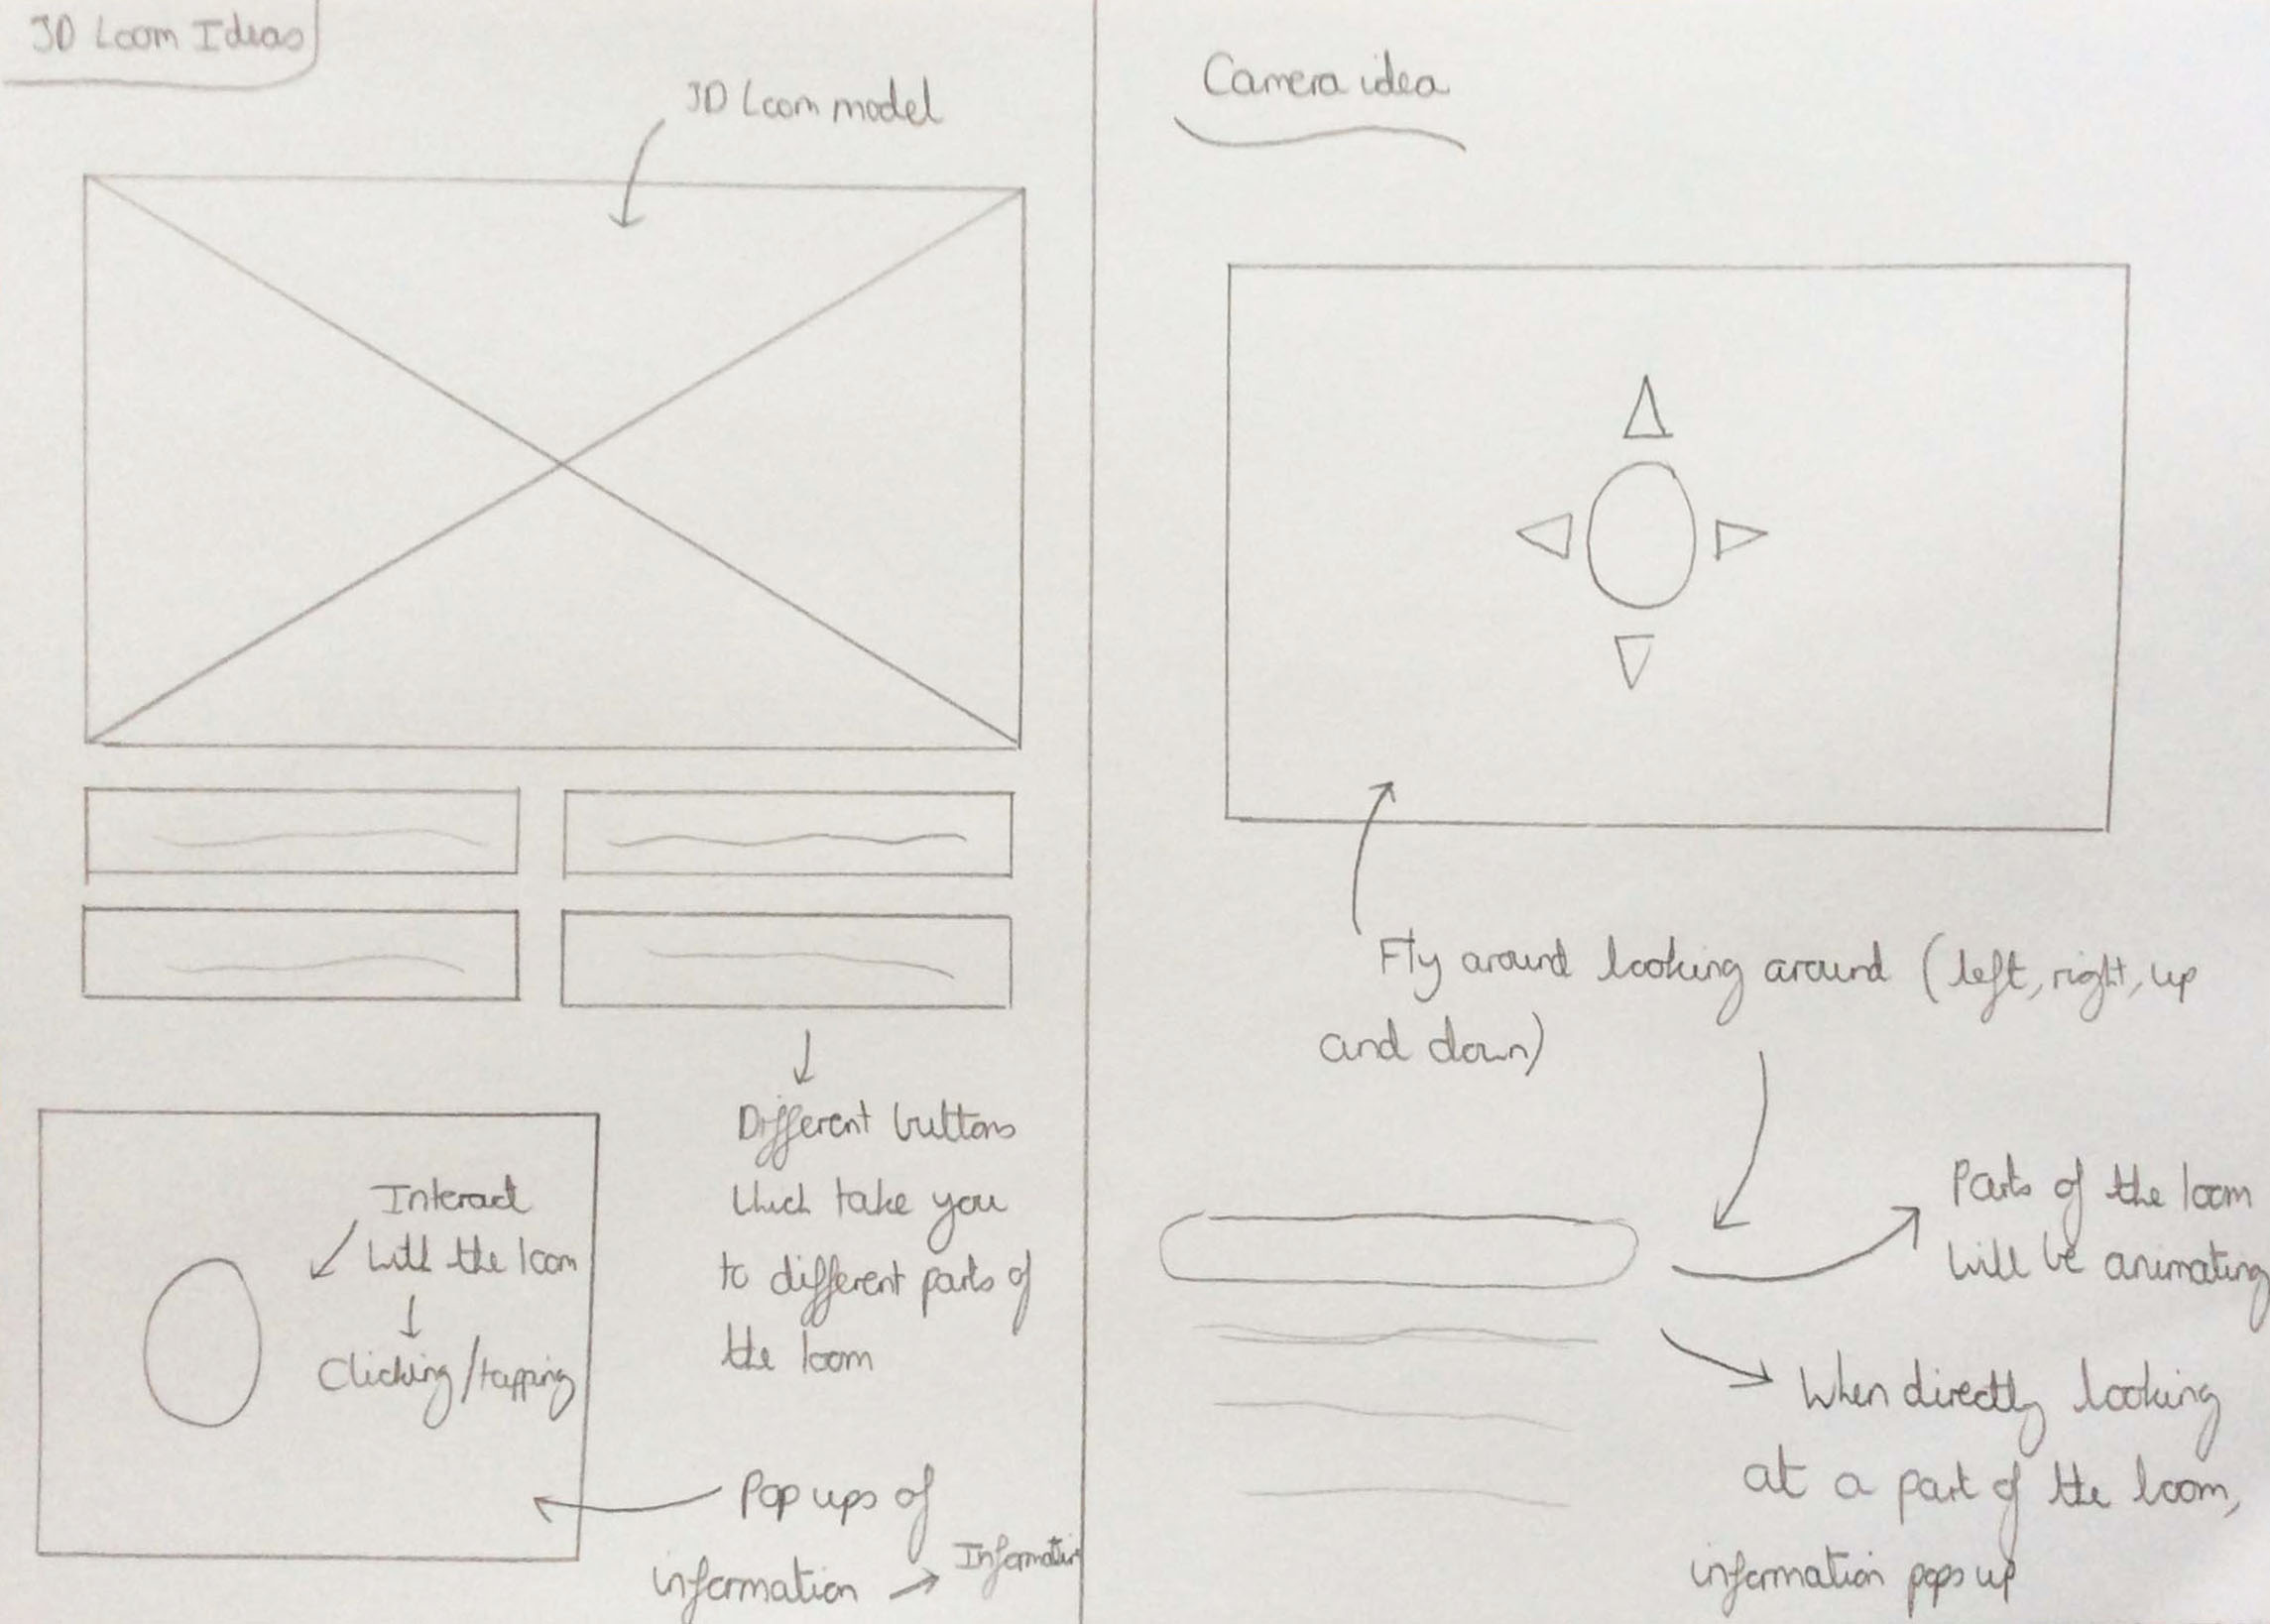
After undertaking research, I then decided produced some ideas for the 3D loom brief. The sketches can be seen below.
The first idea, situated on the left-hand side of the first sketch, was where there would have been a 3D model of the loom either on a web page or application. The user would have been able to have selected different buttons labelling different parts of the loom and this would have taken them to a specific part of the loom where they could have viewed a video, animation or have interacted with the model as well as being able to have read information about that part.
The second idea was the concept of the user being a camera which could have been controlled by using either keys for a web page or swiping with a finger on an application. Whilst navigating through the loom as the camera, the user would have seen constant animation of the loom and when the user would have looked directly at a part of the loom, information would have popped up about that part. This was similar to virtual reality without the virtual headset.
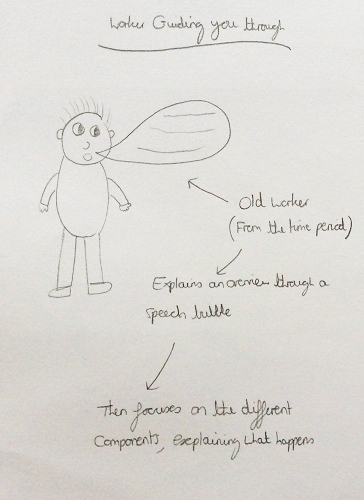
The final idea included an old-fashioned worker of the mill which would have guided the user through different aspects of the loom explaining what each part's function. The final idea was inspired by the images below the sketches.
Sketches of Ideas
Ideas 1 and 2 for the 3D Loom Brief
Idea 3 for the 3D Loom Brief
Inspiration for the Final Idea Above
'BBC Bitesize' Game Inspiration
Interactive Books Game from the 'App Store' Inspiration
3D Waterwheel Brief
Overview
I also then produced some ideas for the 3D waterwheel brief for the group and the sketches can be seen below.
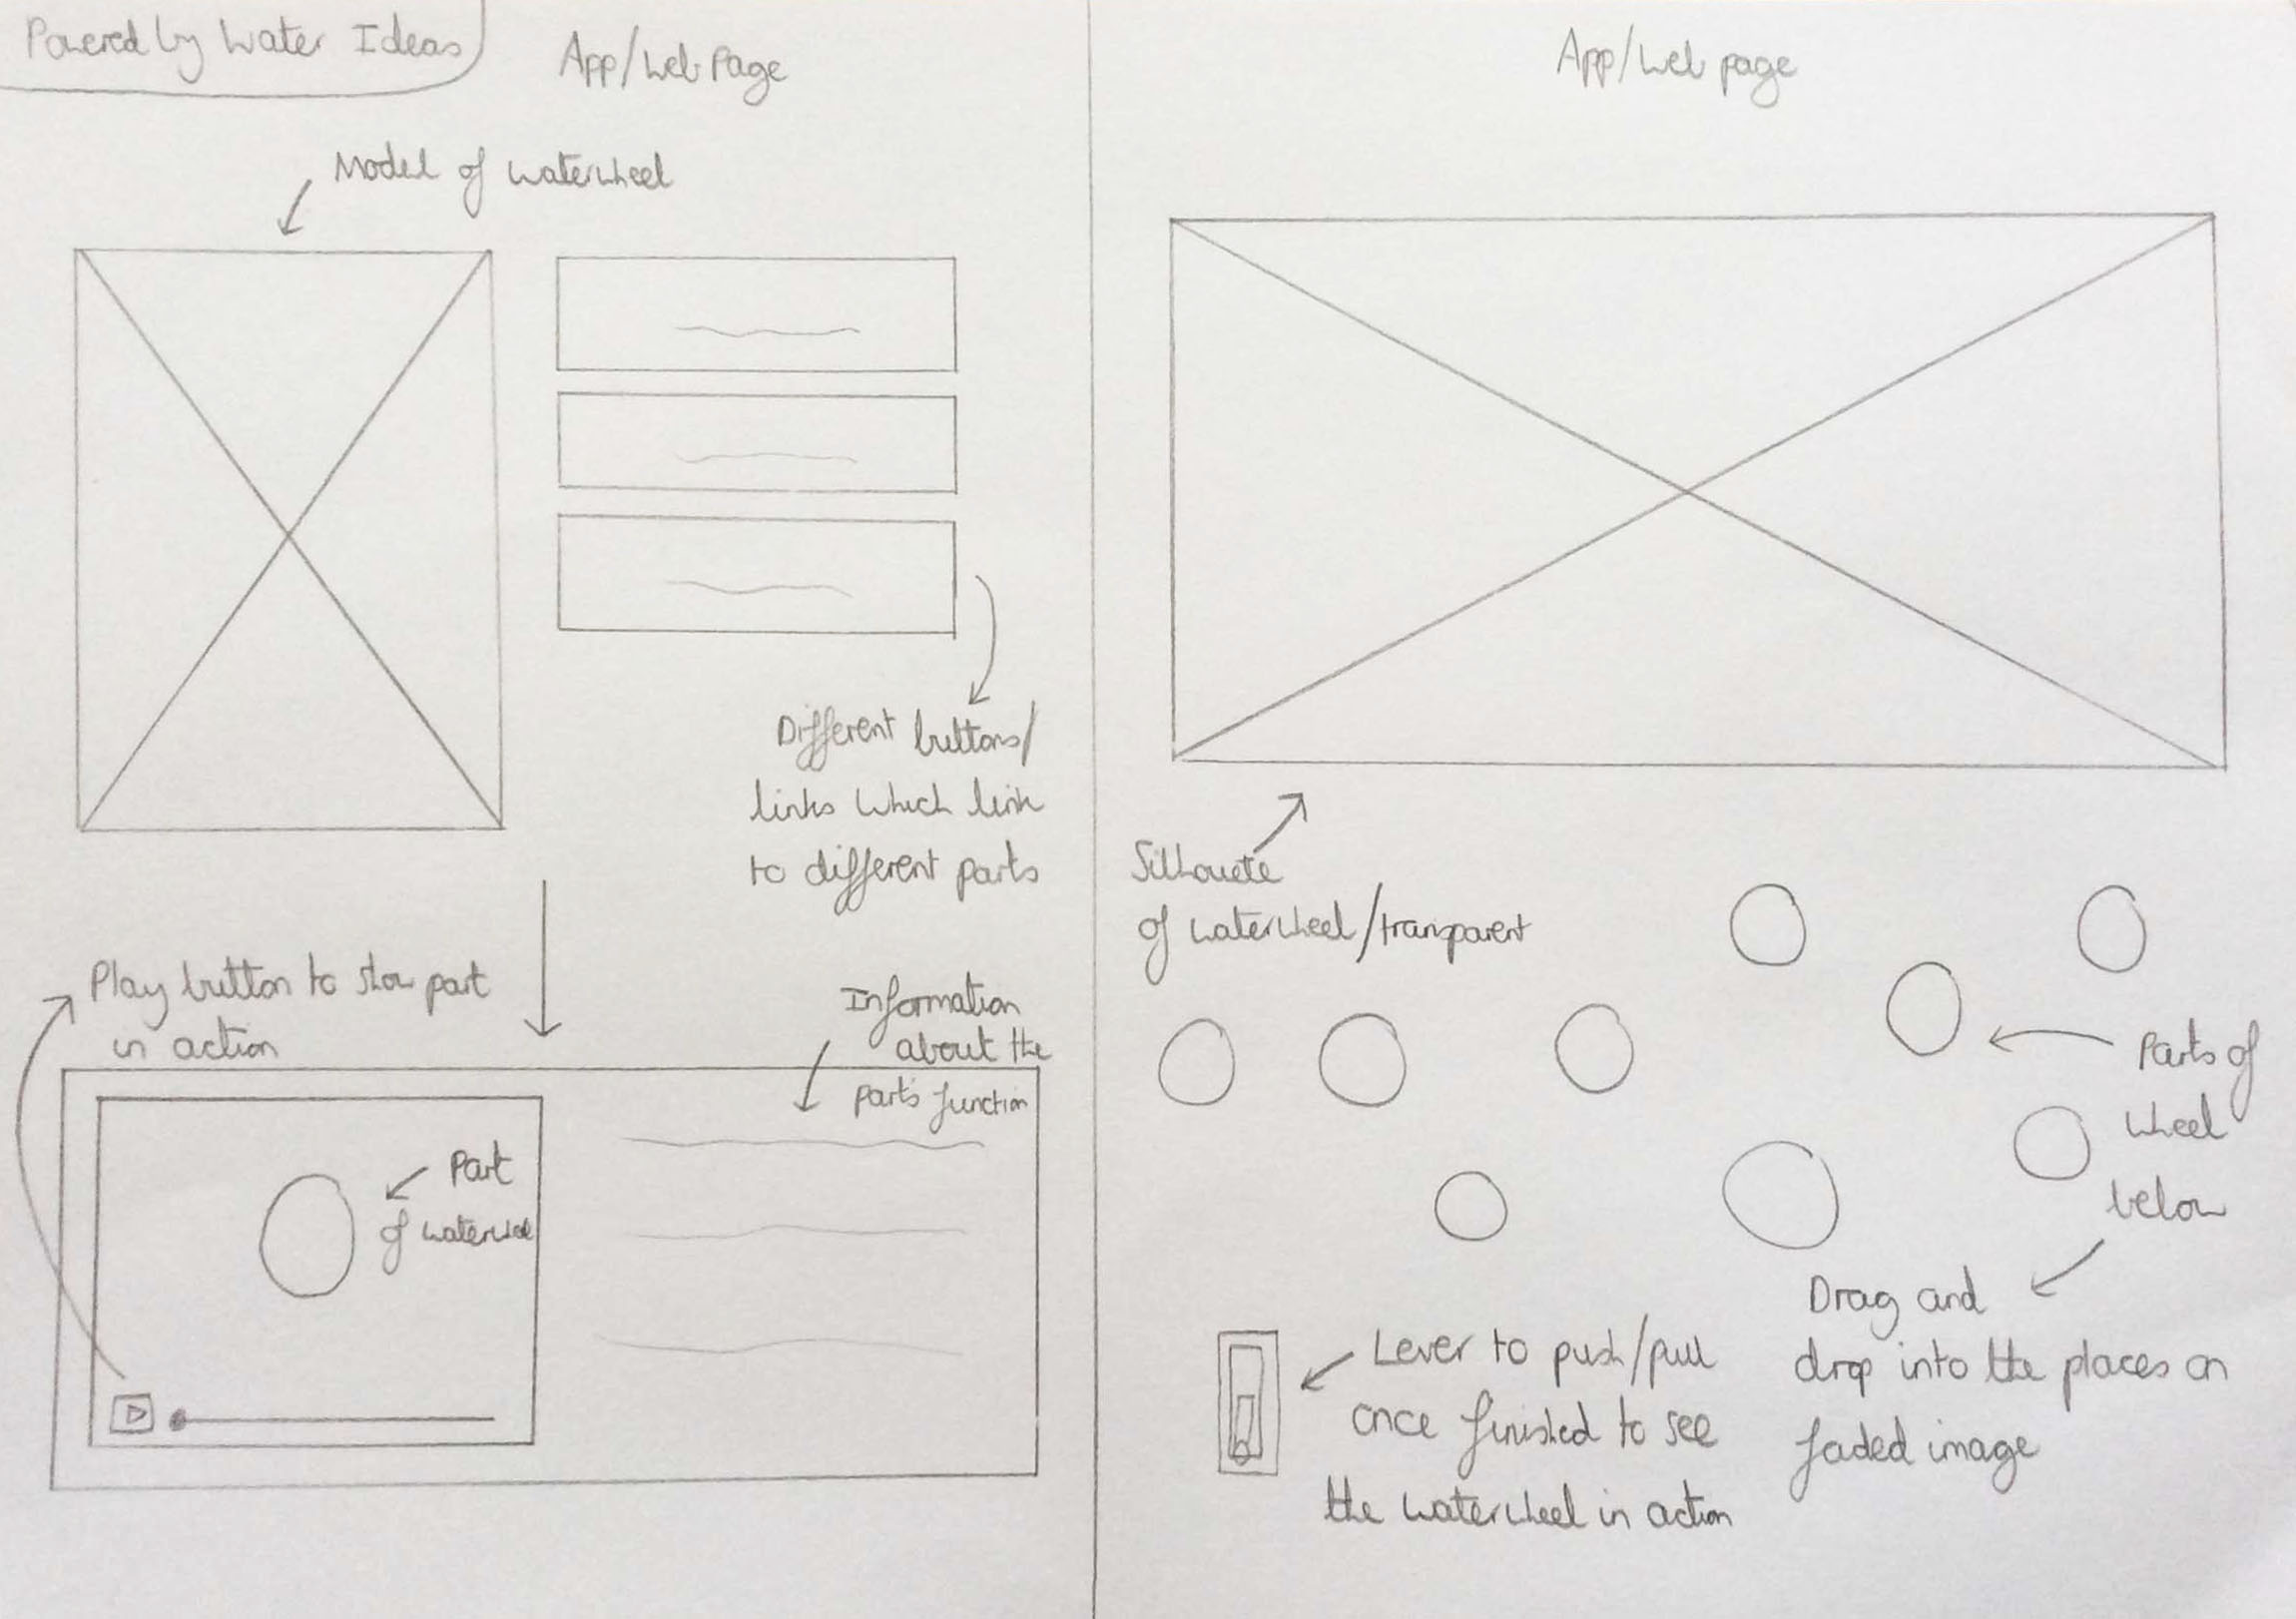
The first idea, situated on the left-hand side of the first sketch below, was exactly the same concept as the first idea for the 3D loom brief above. The user would have been able to have interacted with the 3D model by clicking on buttons labelling different parts and this would have taken them to that specific part of the waterwheel where they could have viewed a video, animation or have interacted with it as well as being able to read information about that part.
The second idea was a similar concept to that of the activity in the 'STEAM Museum', as previously mentioned. There would have been a transparent image of the waterwheel which the user would have had to have placed different parts of the waterwheel together on top of. When hovering over each part, information would have appeared about it. Once the user would have finished, they would have had the option to either push a button or pull a lever which would have operated the waterwheel, allowing the user to understand how it animated.
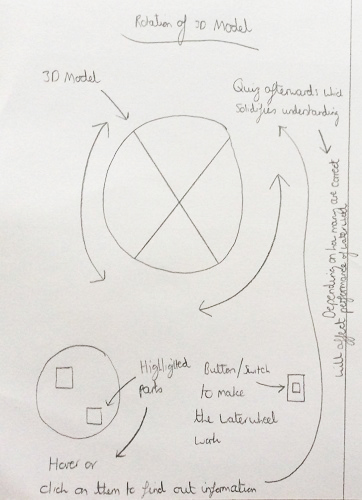
The final idea for the brief would have allowed the users to have rotated the 3D model and to either have hovered or clicked on highlighted parts to read some information about their purpose/function. There would have also been a quiz afterwards which would have solidified understanding of how the waterwheel worked with the quantity of correctly answered questions determining the performance of the waterwheel.
Sketches of Ideas
Ideas 1 and 2 for the 3D Waterwheel Brief
Idea 3 for the 3D Waterwheel Brief
Choosing the Final Ideas
Overview
After producing some ideas for both briefs, I then analysed the advantages and disadvantages of each idea to help the group and myself choose two ideas, one being for each brief.
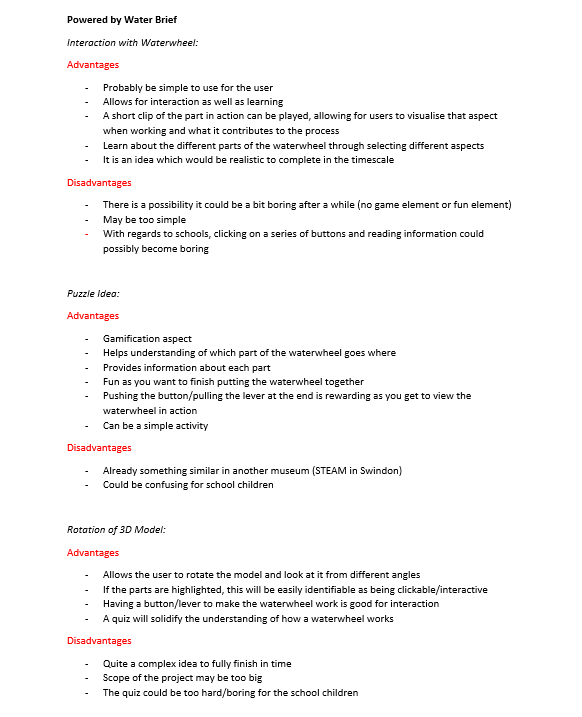
The client was then sent an e-mail with the ideas to gain feedback as the outcome would have been for them and not our group. The ideas which were suggested were the two first ideas of each project. The client responded and liked the idea suggested for the interactive model of the 3D loom. However the idea for the interactive 3D waterwheel was required to be more interactive. Therefore the idea that was suggested wasn't chosen. The chosen ideas were the first idea for the 3D loom project and the second idea for the 3D waterwheel project. This was due to the fact that they were ideas which could have been achieved within the timescale of the projects but also ideas that were simple but effective. With regards to the 3D waterwheel idea, we believed this to encourage learning through a gamification aspect in a simple but effective way.
Please note that as the project developed, the other developer adapted the 3D waterwheel idea to suit the chosen 3D loom idea and also implemented a quiz aspect. Proof of the e-mails would have been included but because of Data Protection, they haven't been included. Instead, the client wrote a couple of paragraphs to prove there was contact and this can be viewed on this page near to the end.
Analysing Each Idea
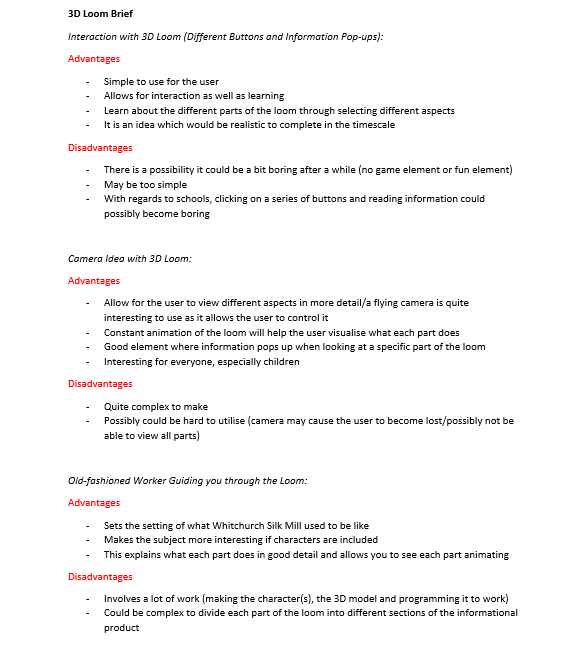
3D Loom Ideas Analysis
3D Waterwheel Ideas Analysis
Further Research
Overview
After deciding which ideas to make into outcomes for each project, I then undertook further research to understand more ways of allowing for interaction which related to our chosen ideas. This research can be viewed below.
The first two images were further research of 'Cells Alive' which demonstrated the fact that the part of a cell was highlighted when hovering over it and then once clicked, it would have taken the user to a separate screen explaining to the user information about this particular part.
With regards to the second two images, this was 'Amplifon' which allowed the user to interact with different parts of an ear, both the outer and inner. When the user hovered over a part of the ear, information then appeared explaining what the function of this part was. The user also had the opportunity to view the journey of how sound passed through the ear and into the brain, viewing animations with information when travelling through the ear.
The Collected Research
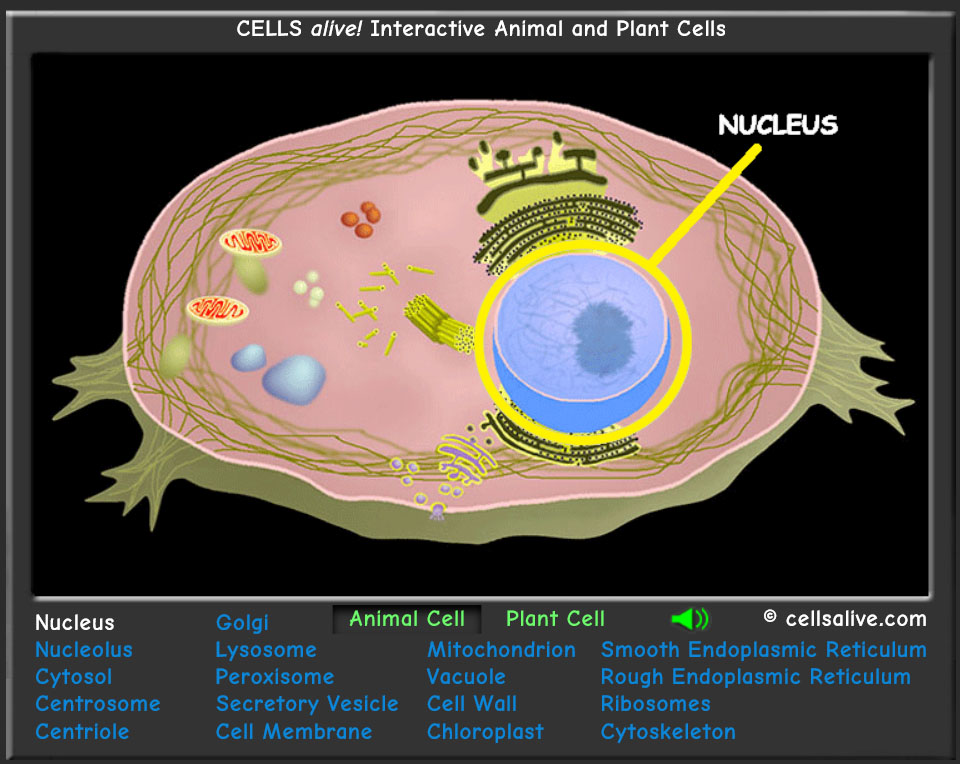
'Cells Alive' Further Research - Highlighting a Cell
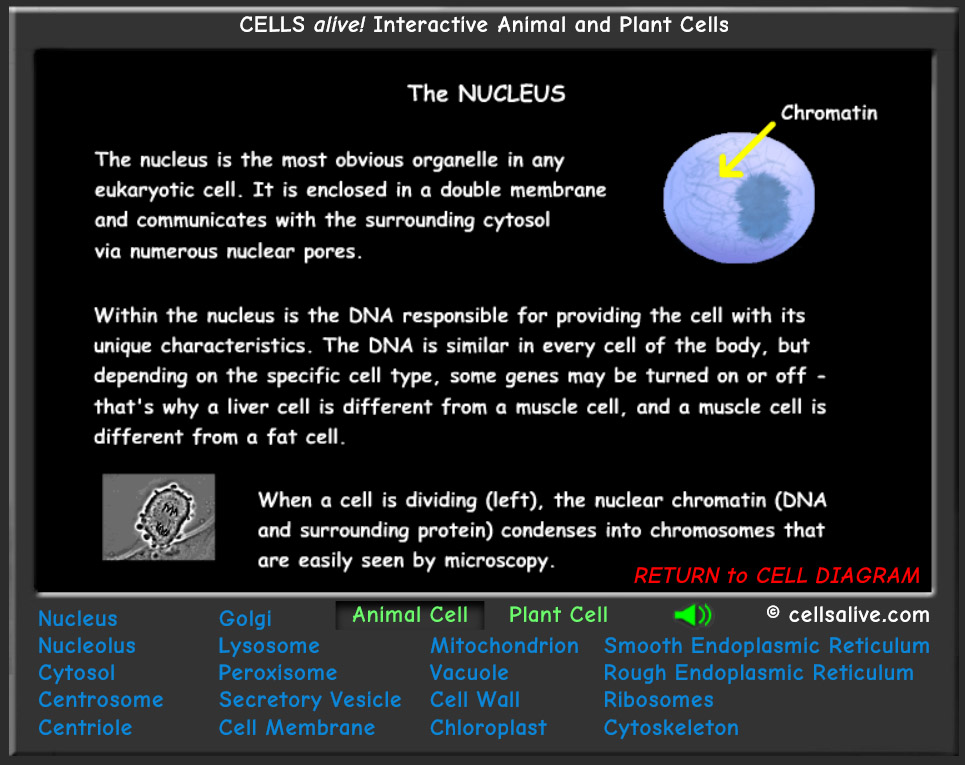
'Cells Alive' Further Research - A Separate Screen with Further Information
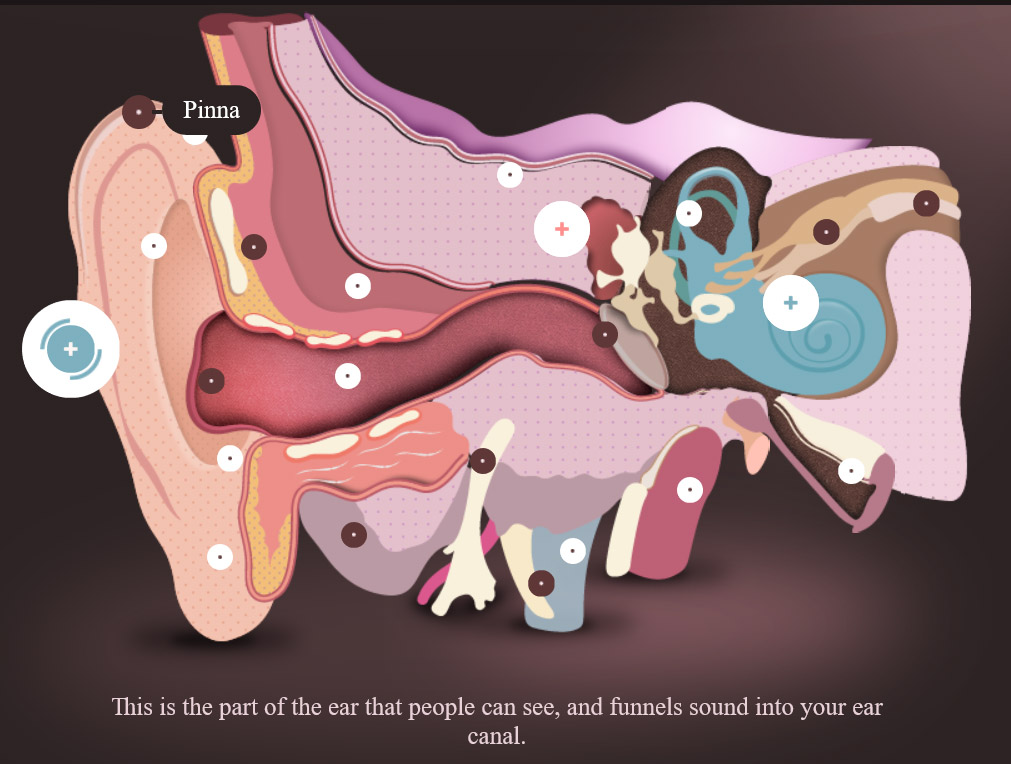
'Amplifon' Further Research - Function of an Ear Part
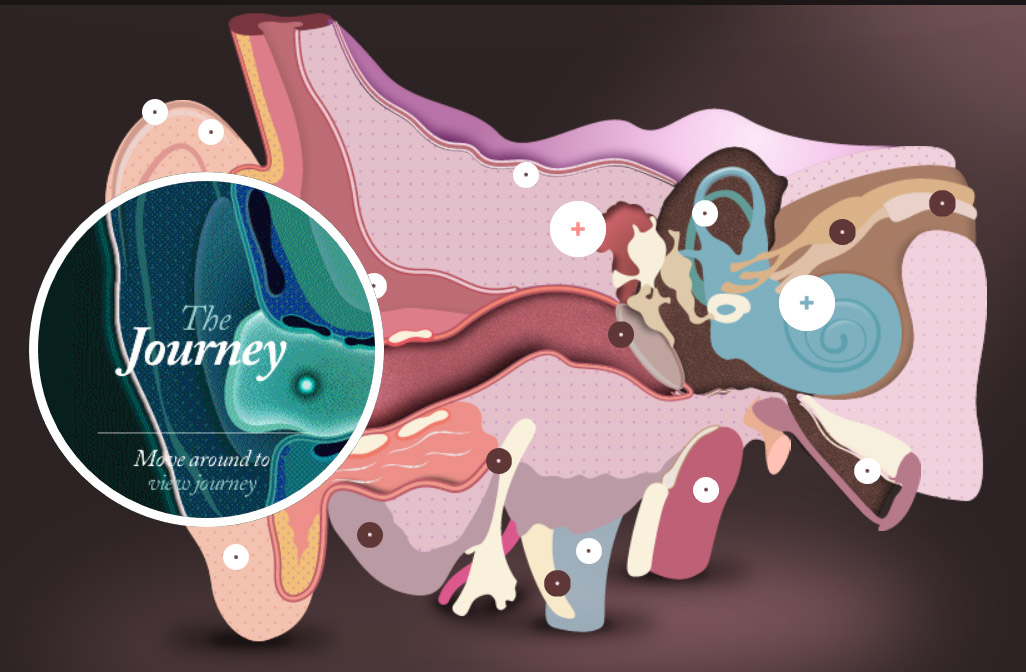
'Amplifon' Further Research - The Journey of Sound
At this stage of the project, the group then divided into two smaller groups of two to work on the two separate projects. It was my task to undertake the development for the project outcome for the 3D loom brief.
3D Loom Project Wireframes
Overview
Due to the fact that the group as a whole had divided into two smaller groups and that I would have been working in the 3D loom project group, I therefore decided to produce some wireframes for the 3D loom project as can be seen below.
Desktop Wireframes
Overview
The first idea would have had the navigation situated across the top of the page with the title and instructions of what to do underneath. Then there would have been the interactive 3D model of the loom placed to the right-hand side of the page with buttons that the user would have selected to go to that specific part of the loom.
With regards to the second idea, the only difference from the last was that the title with instructions and interactive 3D model with its buttons would have been placed in a vertical format.
The third idea displayed the web page when clicking on a part where the user would have been taken to that part to watch a video or animation with information placed underneath.
Likewise, the fourth idea was the same. However, the user would have been able to have interacted with the model rather than watching a video.
The Created Wireframes
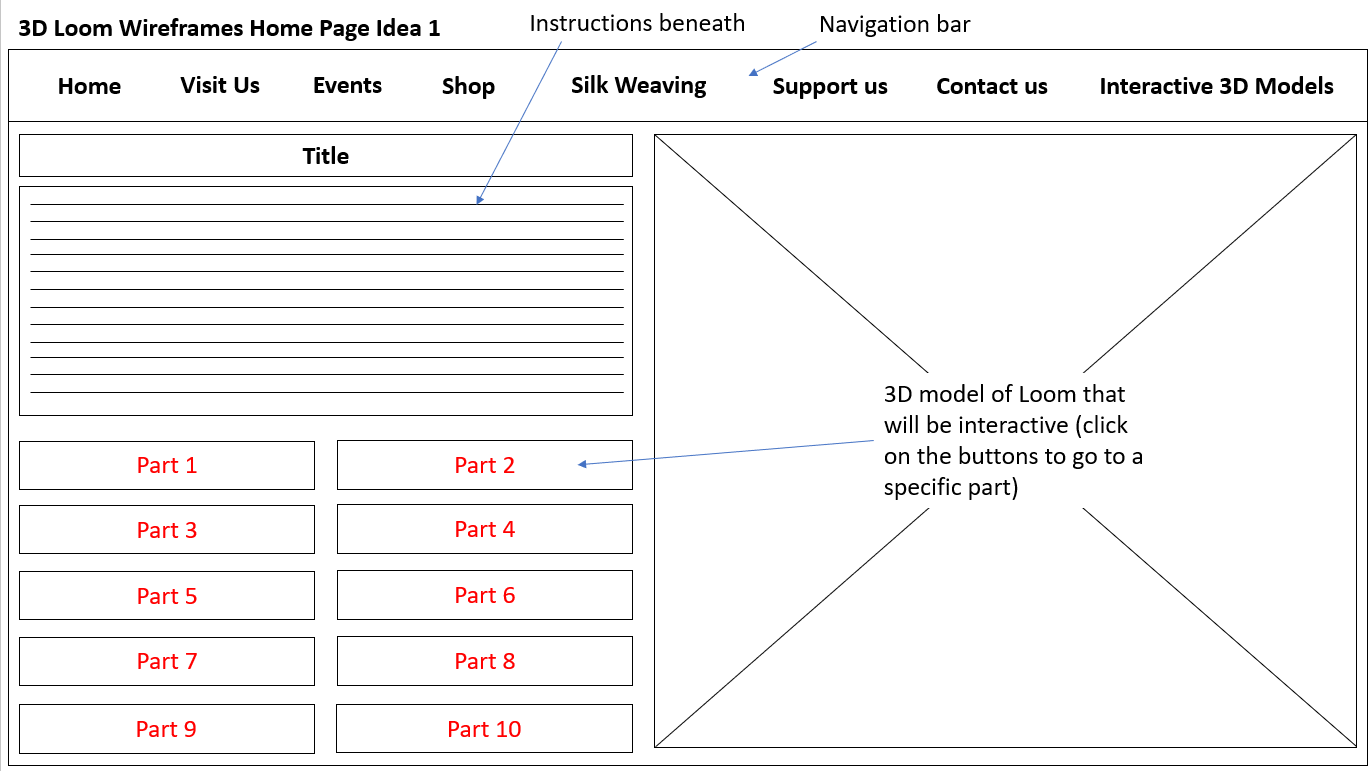
Home Page Wireframe Idea 1
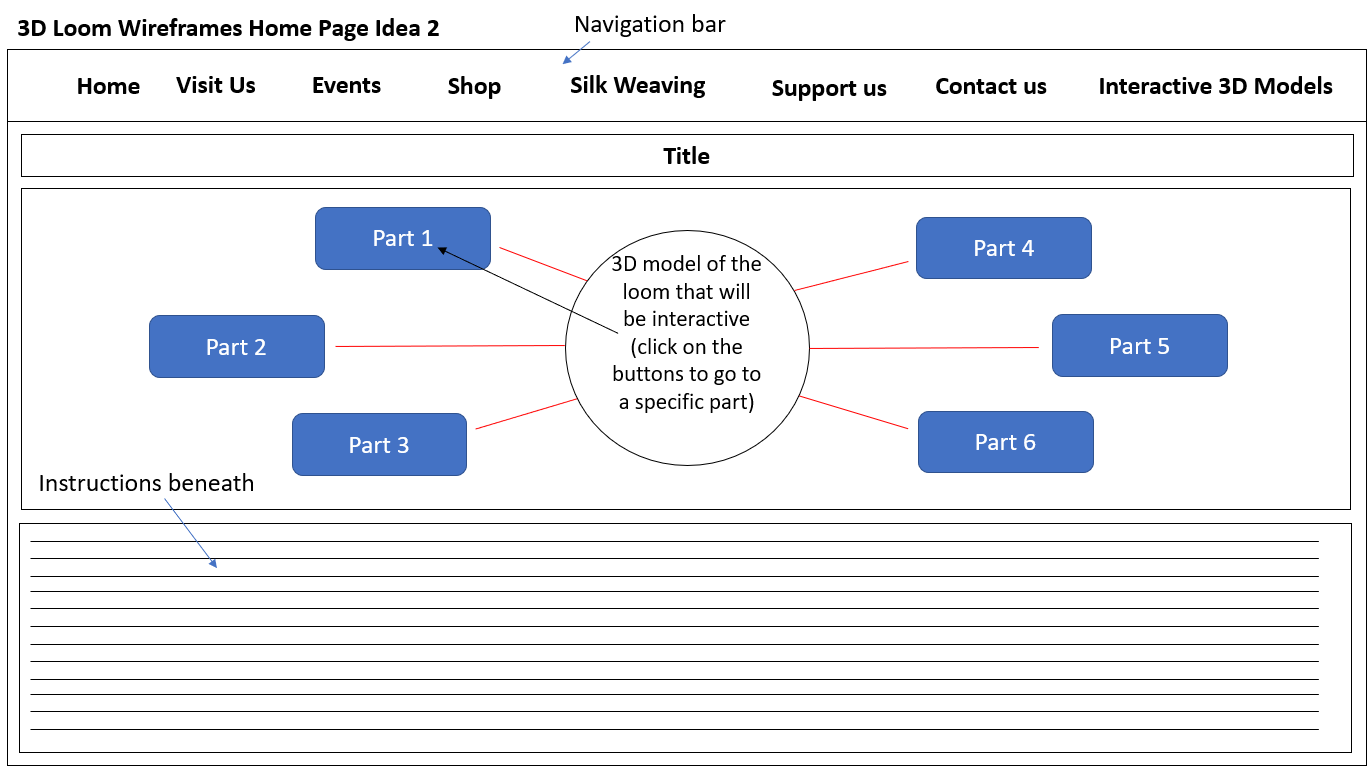
Home Page Wireframe Idea 2
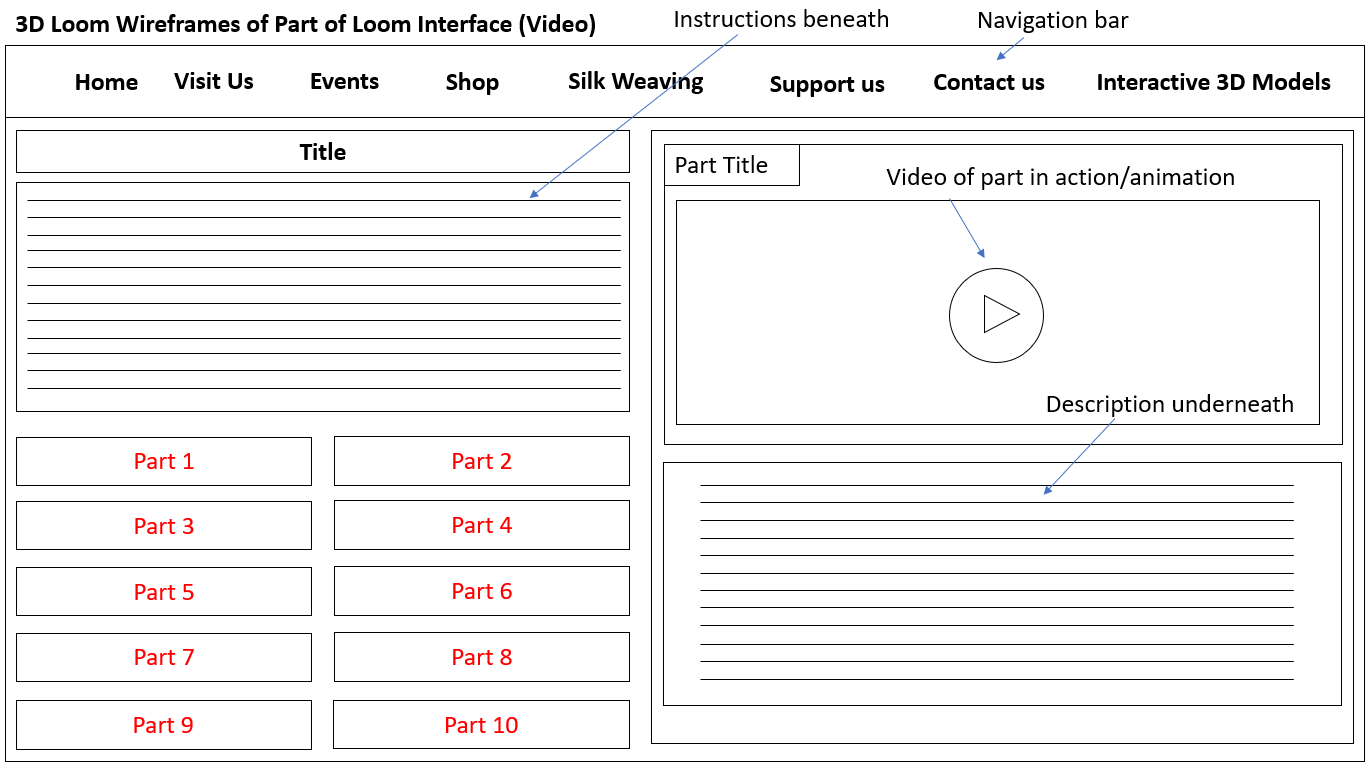
Loom Interface Wireframe Idea 1
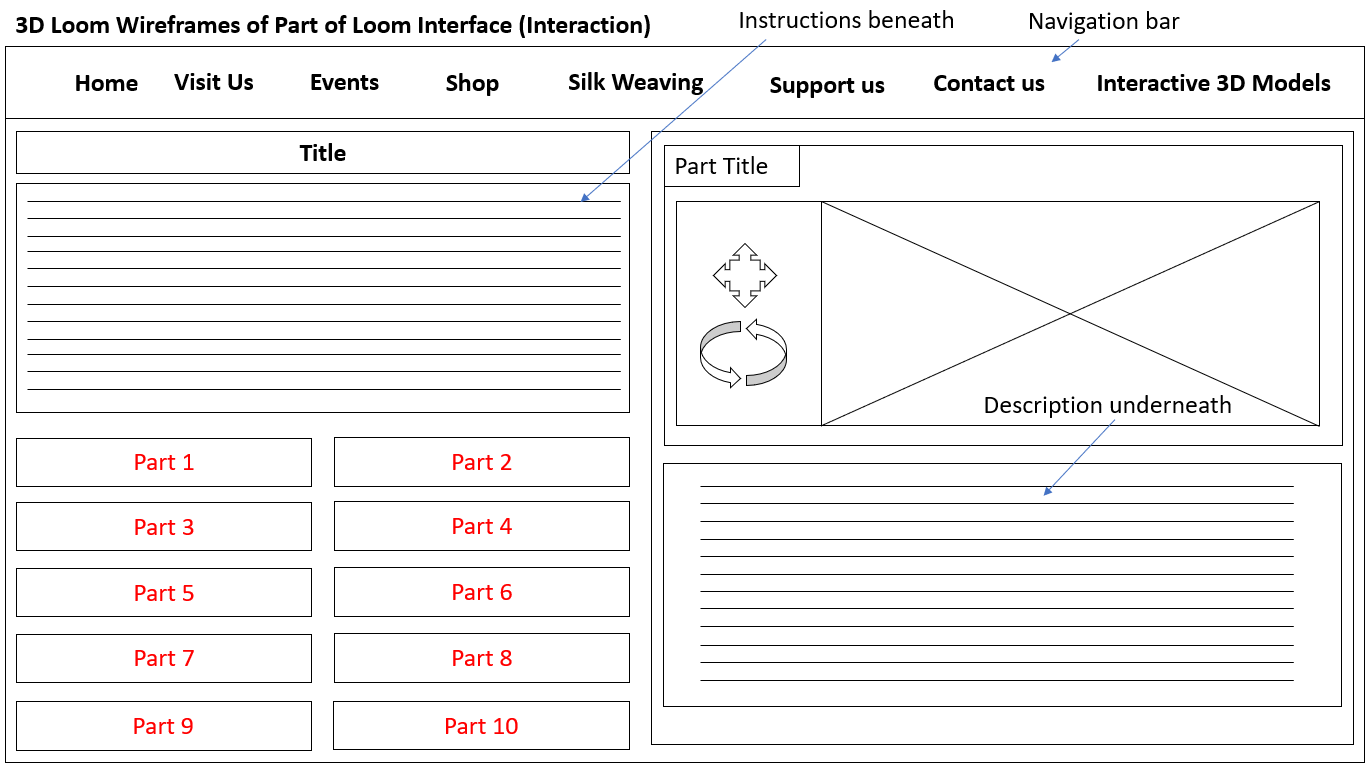
Loom Interface Wireframe Idea 2
Tablet Wireframes
Overview
The two wireframes below related to how the web page would have appeared on a tablet device. The responsive navigation menu would have appeared in the top right corner with the title to the left. The first wireframe showed the fact that the instructions would have been situated at the top with the interactive 3D model and buttons placed below whereas the second wireframe demonstrated the fact that the instructions and buttons would have been placed below the interactive 3D model.
The Created Wireframes
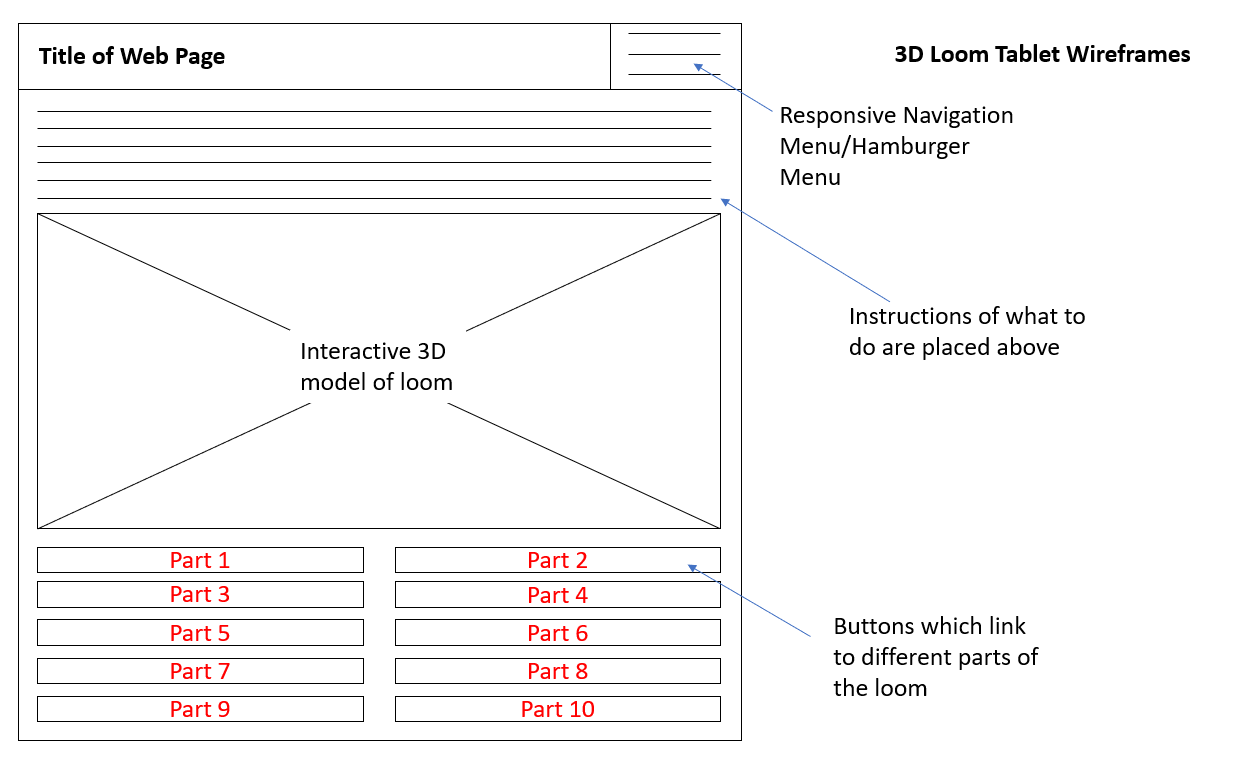
3D Loom Tablet Wireframe 1

3D Loom Tablet Wireframe 2
Mobile Wireframes
Overview
The wireframes below related to how the web page would have appeared on a mobile device with the 3D model being placed at the top with the instructions and buttons placed underneath but also with the buttons surrounding the 3D model and the instructions underneath. There would have also been a responsive navigation menu placed in the top right.
The Created Wireframes
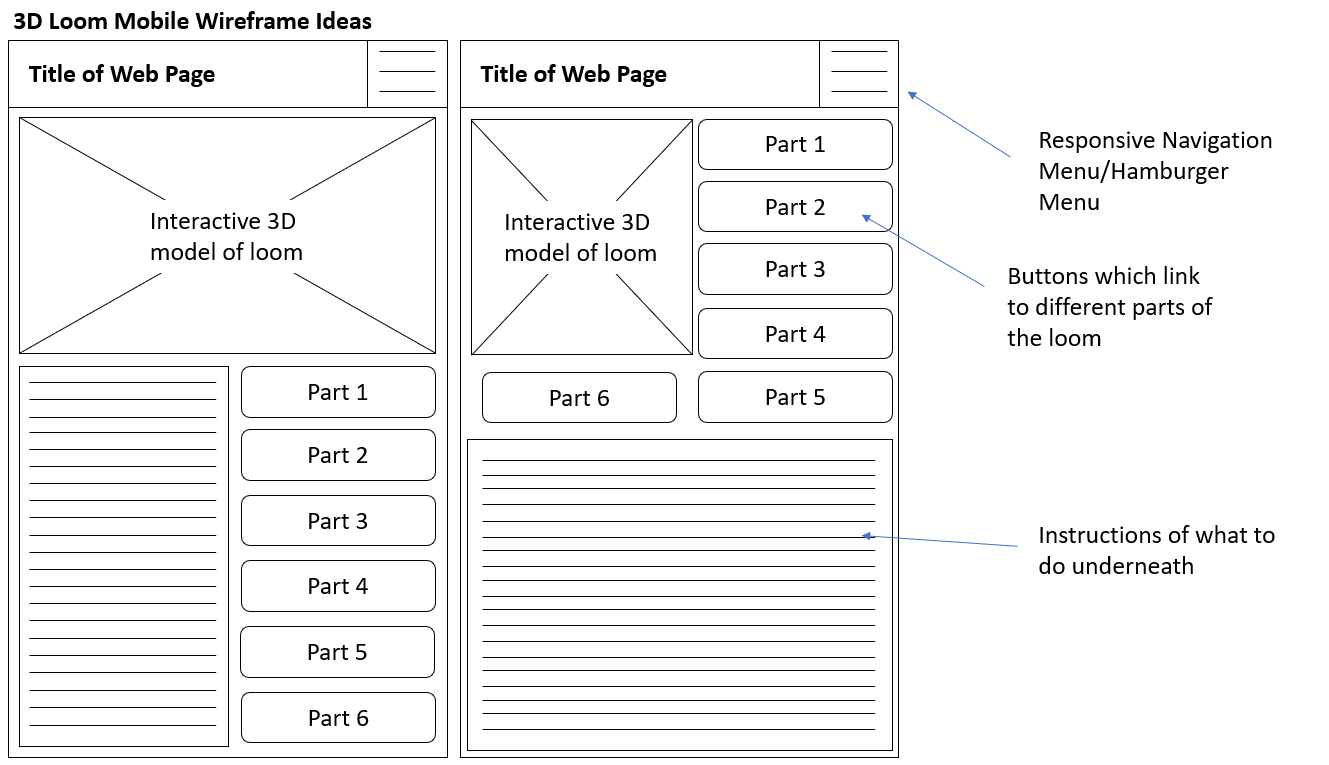
3D Loom Mobile Wireframe Ideas
Sitemaps for Both Projects
Overview
During the earlier stages of the project, I produced a couple of sitemaps, one for each brief for the group to analyse how the navigation would have worked. Although the ideas did change later on in the process, this was still beneficial as a starting point. The sitemaps were simple but because not many pages were going to be included, this was why.
3D Loom Project Sitemap
Overview
This sitemap showed the web page for the 3D loom project. The user would have navigated to the 3D loom page where they could have then selected any part to go to that specific part of the loom. Then they would have been able to have viewed a video/animation of that part with information to read as well. At this stage, I hadn't thought about interacting with the 3D loom model so this was the reason why this hadn't been included.
The Created Sitemap
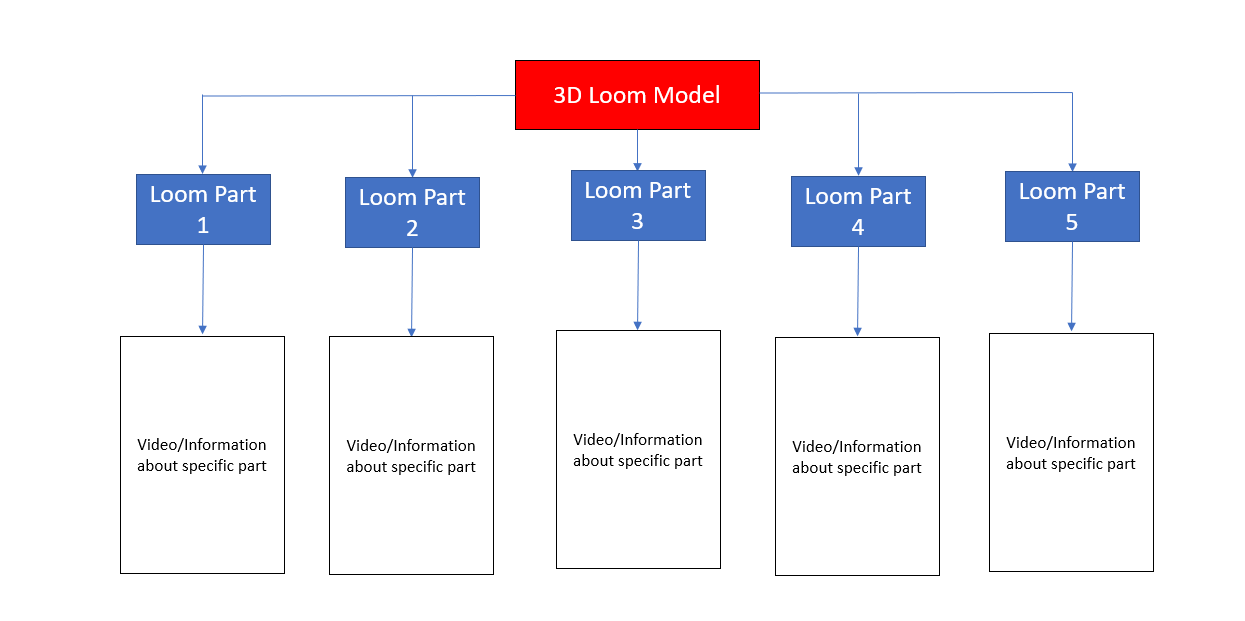
The Created 3D Loom Project Sitemap
3D Waterwheel Project Sitemap
Overview
This sitemap displayed the web page for the 3D waterwheel project. The user would have navigated to the 3D waterwheel page where they could have then selected each piece of the wheel and read information about that piece whilst placing the pieces together. Then once finished, the user would have selected either a lever or button which would have caused the wheel to animate it, explaining how it operated.
The Created Sitemap
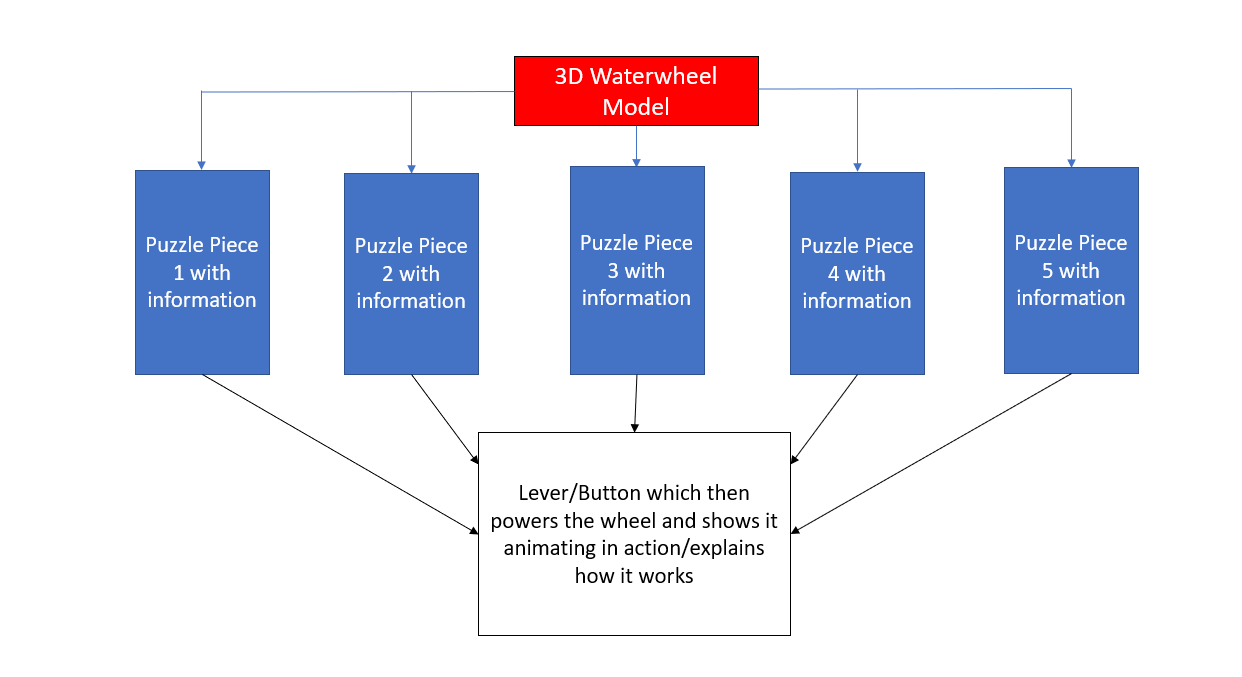
The Created 3D Waterwheel Project Sitemap
Flowcharts
Overview
I then created a couple of flowcharts for the 3D loom project, one which was the original and one which had been improved after having a lecture of creating flowcharts. This was because I realised I hadn't thought about the users interactions very much. I also viewed some inspiration before making the flowcharts which is also evident below.
Inspiration

Flowchart Symbols Research 1
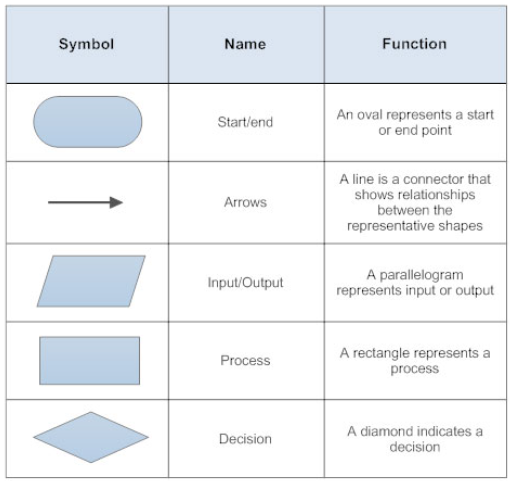
Flowchart Symbols Research 2
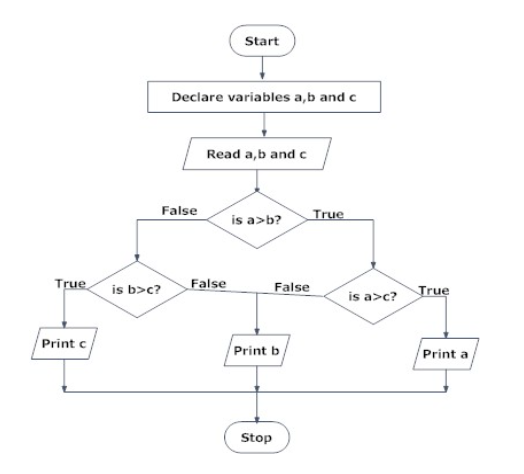
Example of a Flowchart Research
The Created Flowcharts
The Original Flowchart
Overview
This flowchart displayed that the user would have first of all navigated to the 3D loom page and then they would have been taken to that page. After this, they would have then selected any part of the loom which they would have either interacted with or not. If they did interact with the model, they would have clicked and dragged which would have caused the model to move around. If not, they would have either then clicked on the animation or video or not. If they did, then they would have clicked to either animate the model or play the video, causing the model to animate or causing the video to play. Once finished, or indeed if they didn’t click on the animation or video, they would have closed down the modal where this would have been situated and then either exited the web page or continued onto another part of the loom.
The Created Flowchart
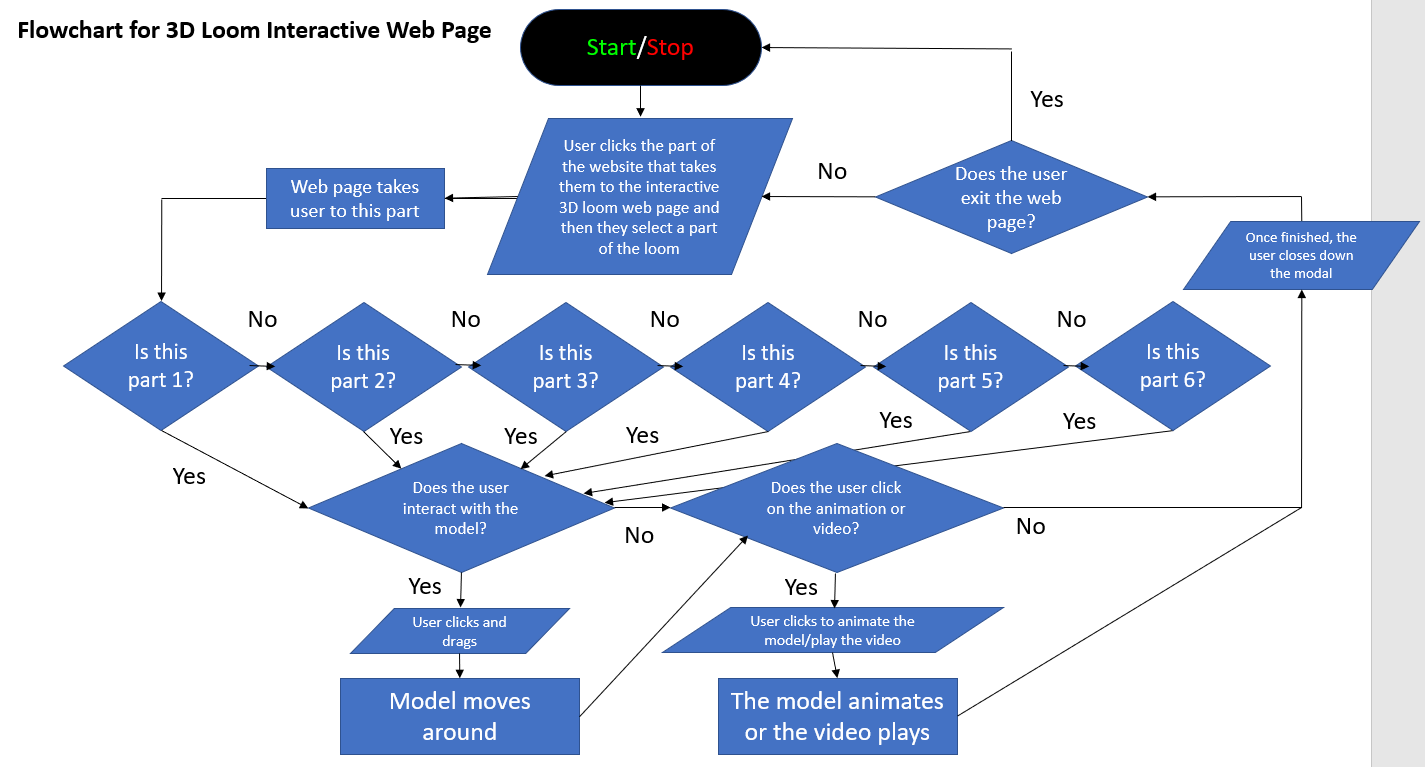
The Original Flowchart
The Improved Flowchart
Overview
The improvements which are evident on the flowchart below showed the fact that there was a more detailed process which included aspects such as navigating to the actual website and reading the information on the web page.
The Created Flowchart
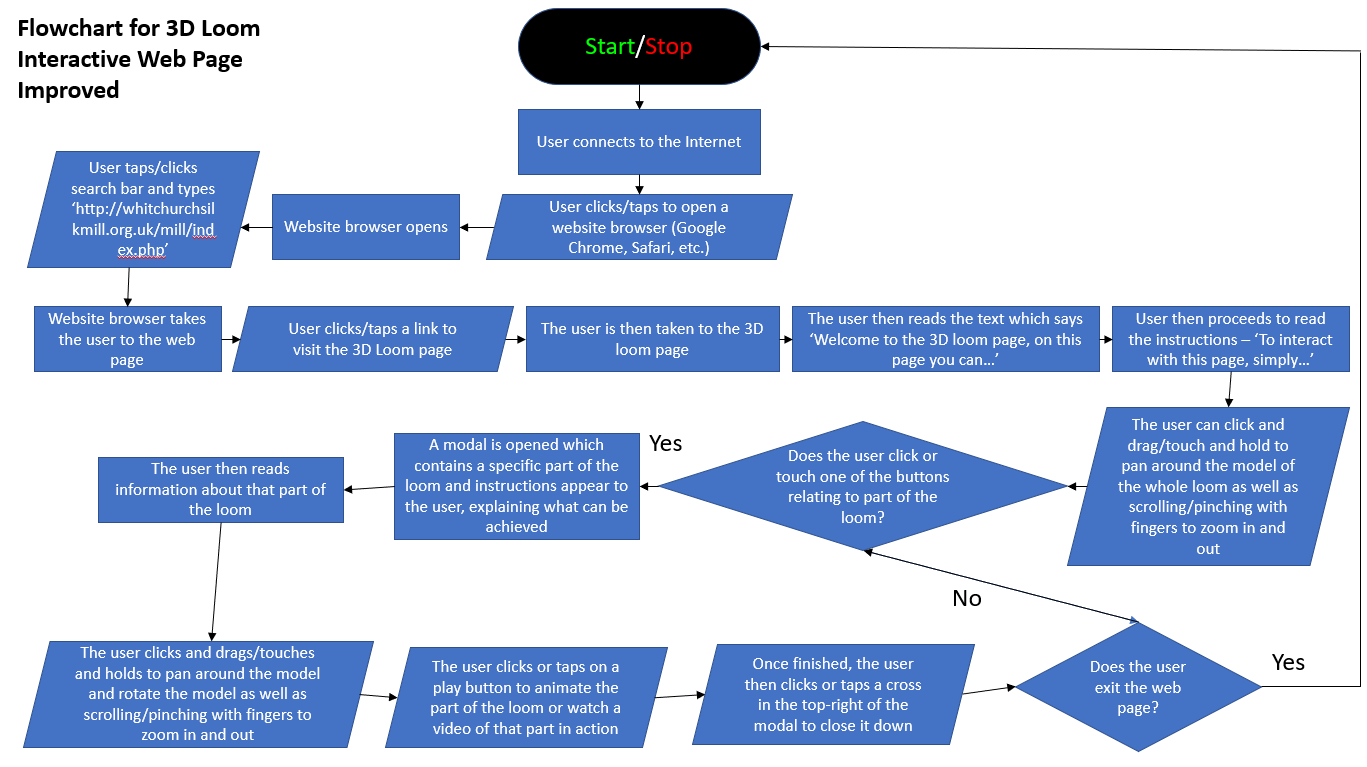
The Improved Flowchart
User Inputs and Interactions and Guidelines
Overview
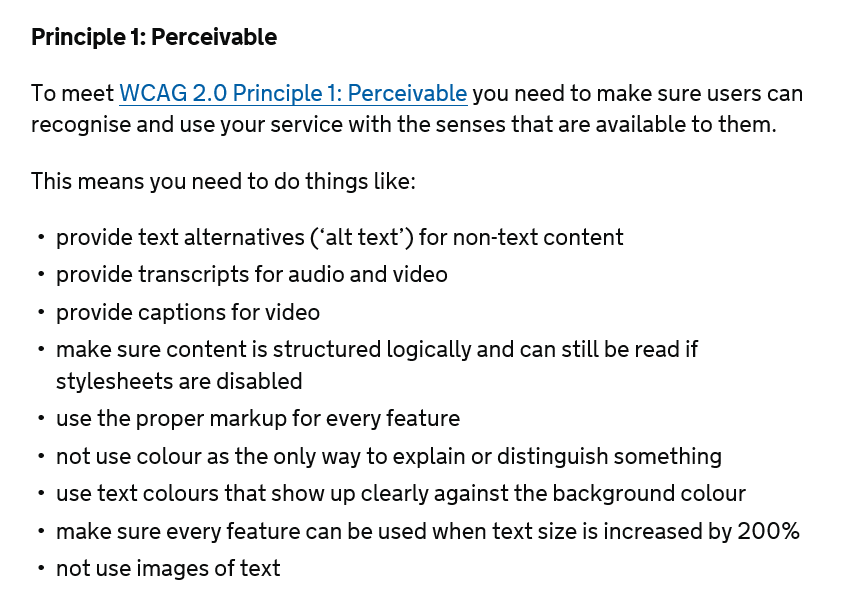
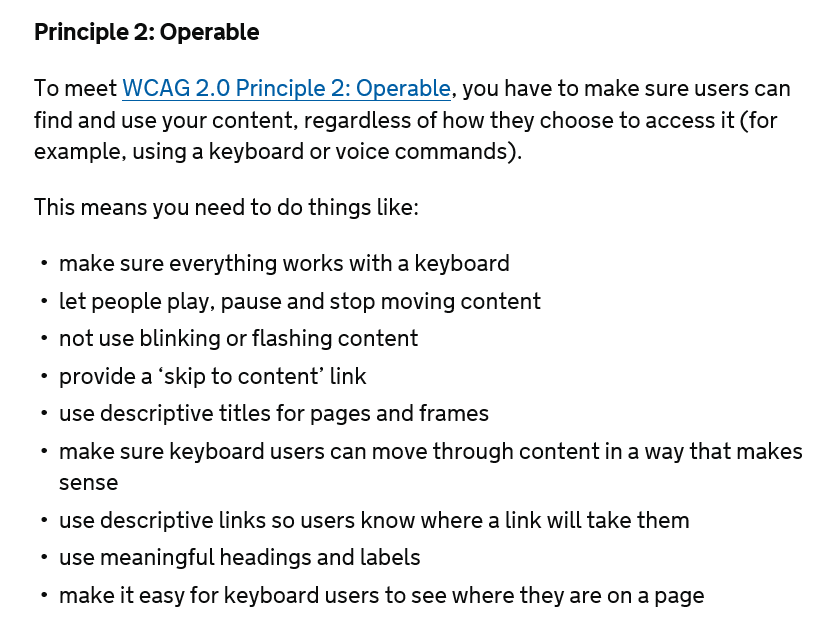
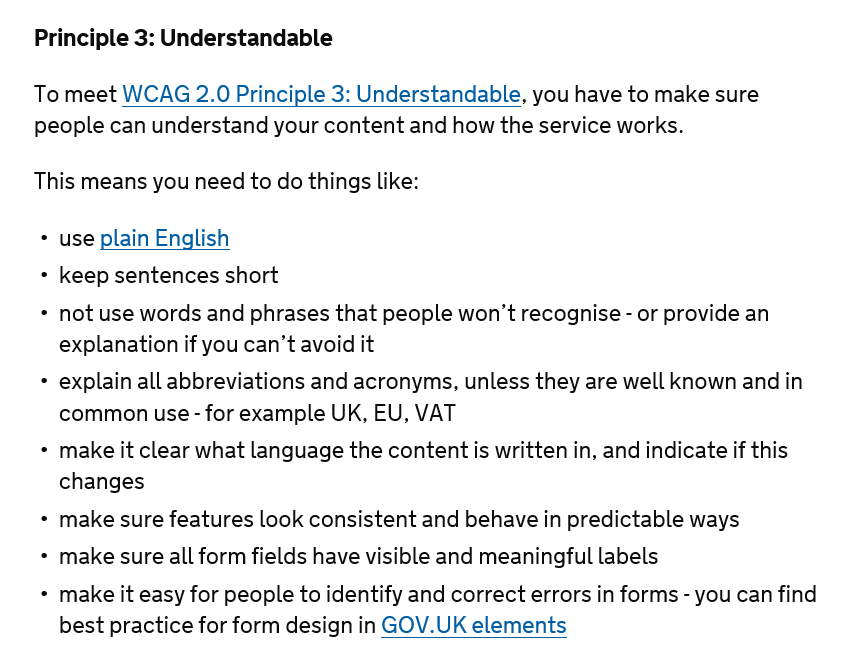
After creating a couple of flowcharts, I then decided to create a sketch which identified the potential ways in which the user could have interacted with the 3D loom page. This was influenced by another team member of which I saw included interactions such as 'left click' in their flowcharts. Some of the information was also found from a book which will be referenced in the portfolio document near to the end of this section. As advised, I also viewed the 'Web Content Accessibility Guidelines' ('WCAG') to understand how the web page could have been accessible and usable for everyone. I understood that the use of 'alt' text with images and allowing for assistive technology to be used were important as well as other areas to acknowledge.
User Interactions Sketches
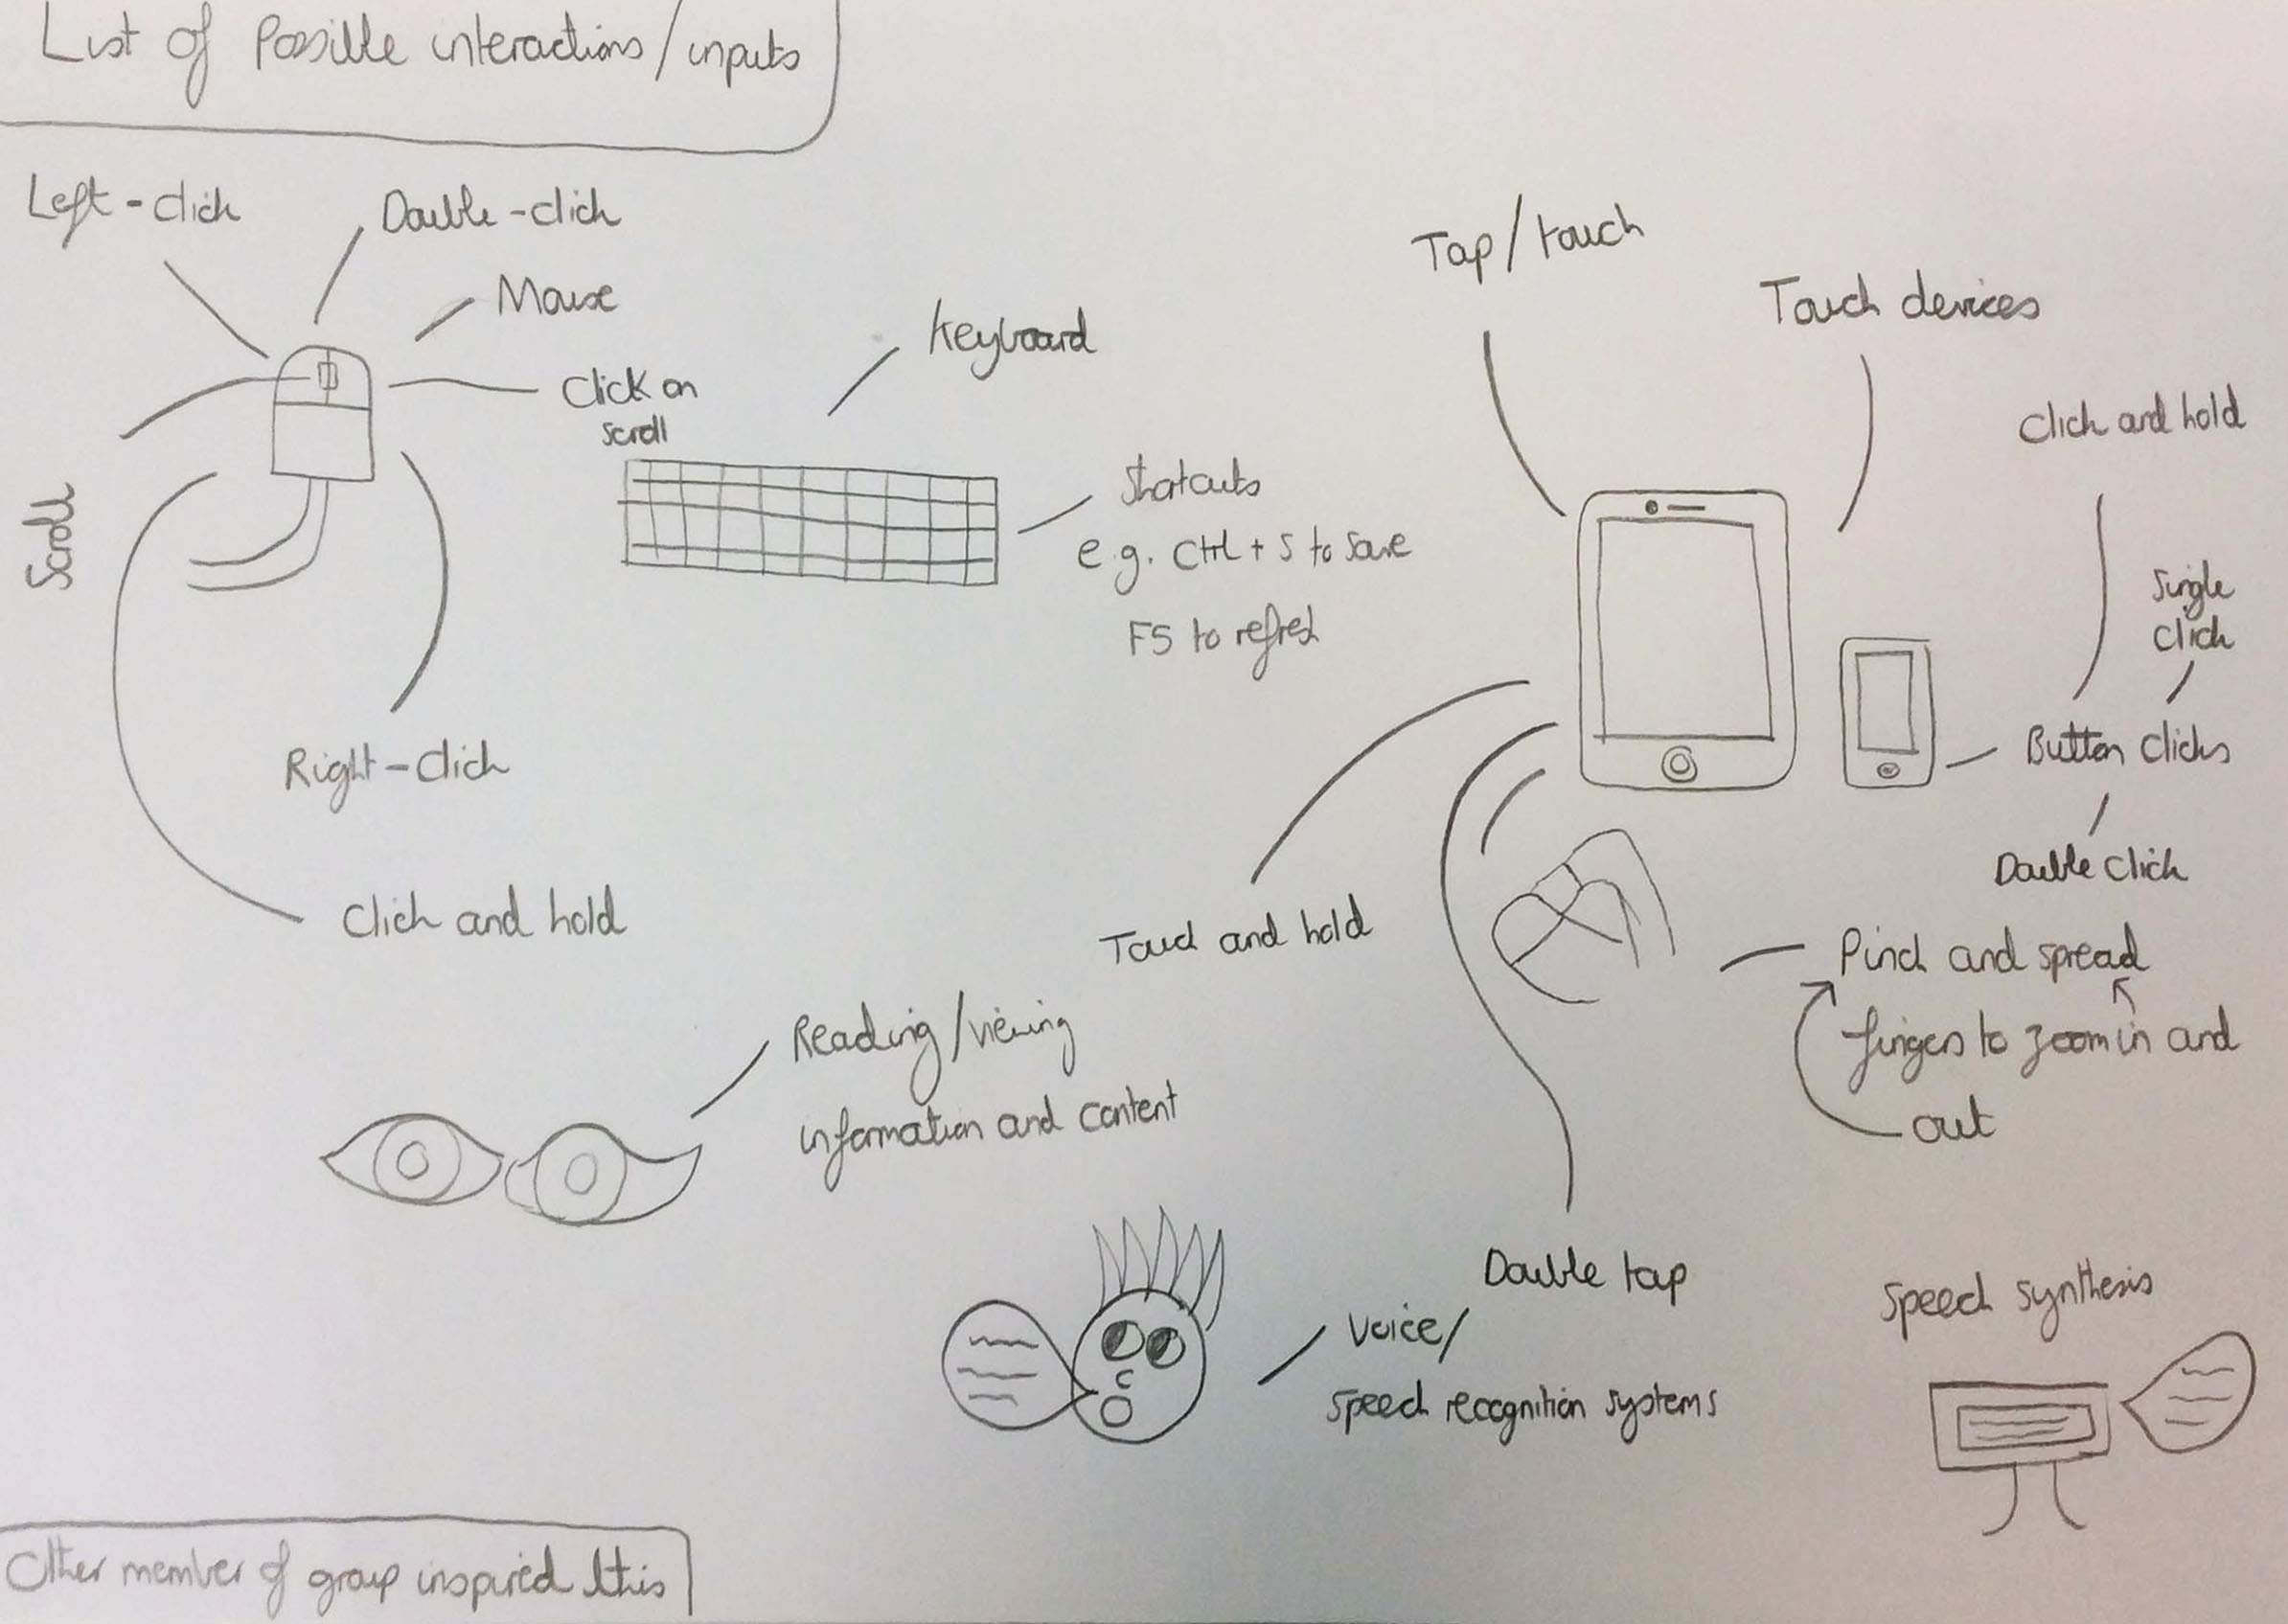
User Interactions Sketches
'Web Content Accessibility Guidelines' ('WCAG') Research

An Overview by 'GOV.UK' of the 'Web Content Accessibility Guidelines'
An Overview by 'GOV.UK' of the 'Web Content Accessibility Guidelines' Continued
An Overview by 'GOV.UK' of the 'Web Content Accessibility Guidelines' Continued
An Overview by 'GOV.UK' of the 'Web Content Accessibility Guidelines' Continued
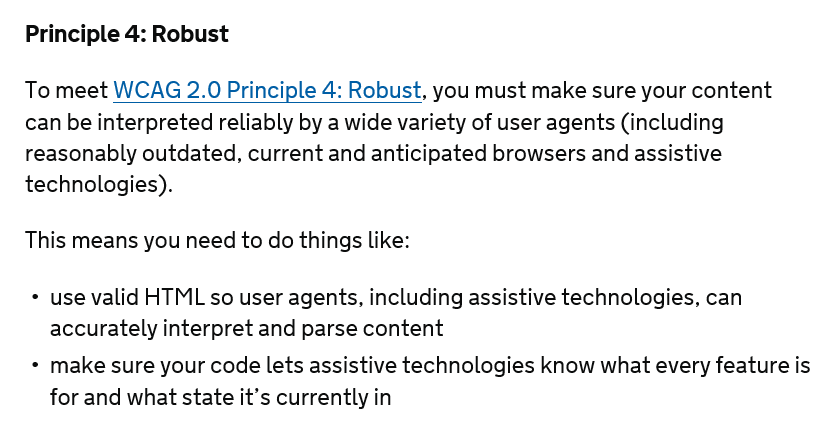
An Overview by 'GOV.UK' of the 'Web Content Accessibility Guidelines' Continued
Research of Mobile Coverage and Broadband Width in the area of Whitchurch
Overview
After thinking about the users and user experience, I then undertook some research on the mobile coverage and broadband width within the area of Whitchurch to understand how this could have potentially affected both outcomes of the projects, as advised by the lecturer. This can be seen below.
Mobile Coverage Research
Overview
I understood that the mobile coverage was very good at the mill as it showed that there was good coverage for the majority of networks with the exception of '4G' for 'Three'. This meant that if the visitors wished to view the web page on a mobile device which provided either '3G' or '4G', they could have.
The Collected Research
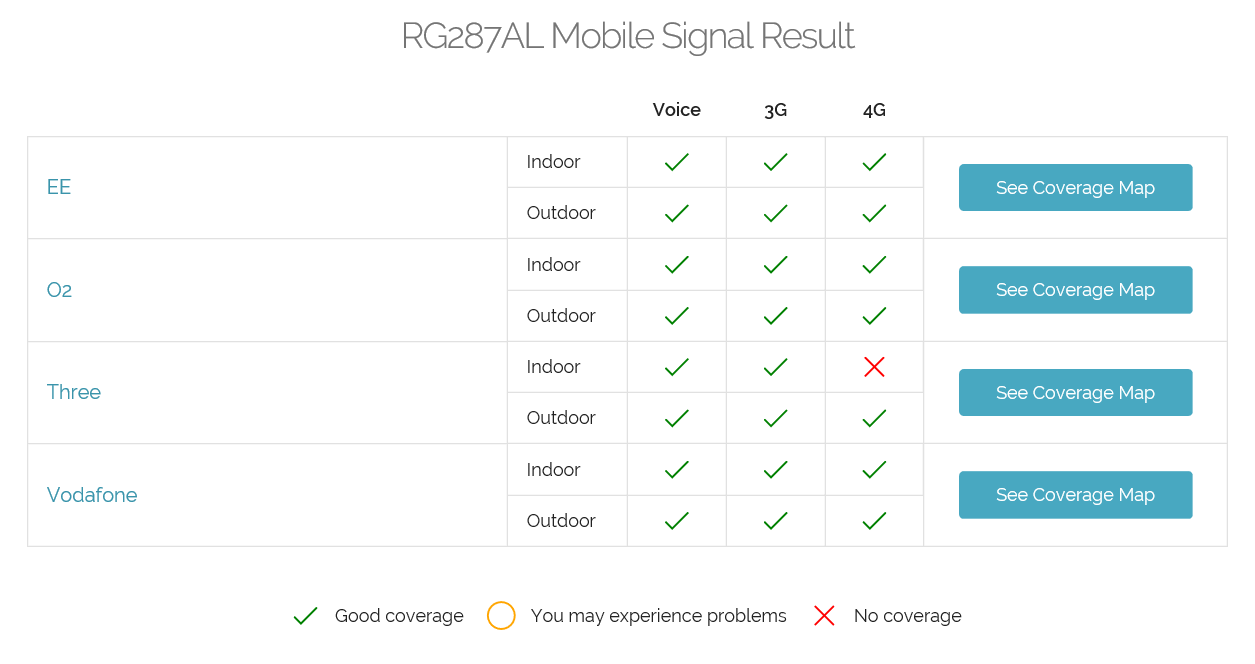
The Mobile Coverage Research
Broadband Width Research
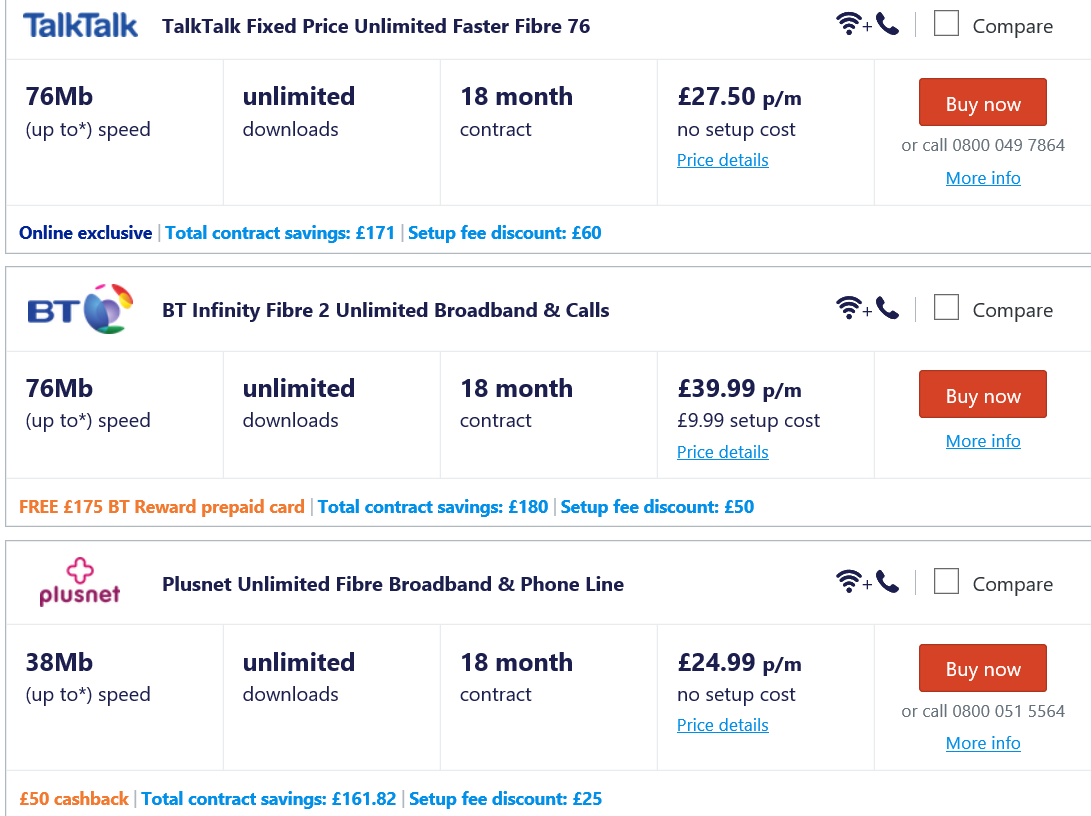
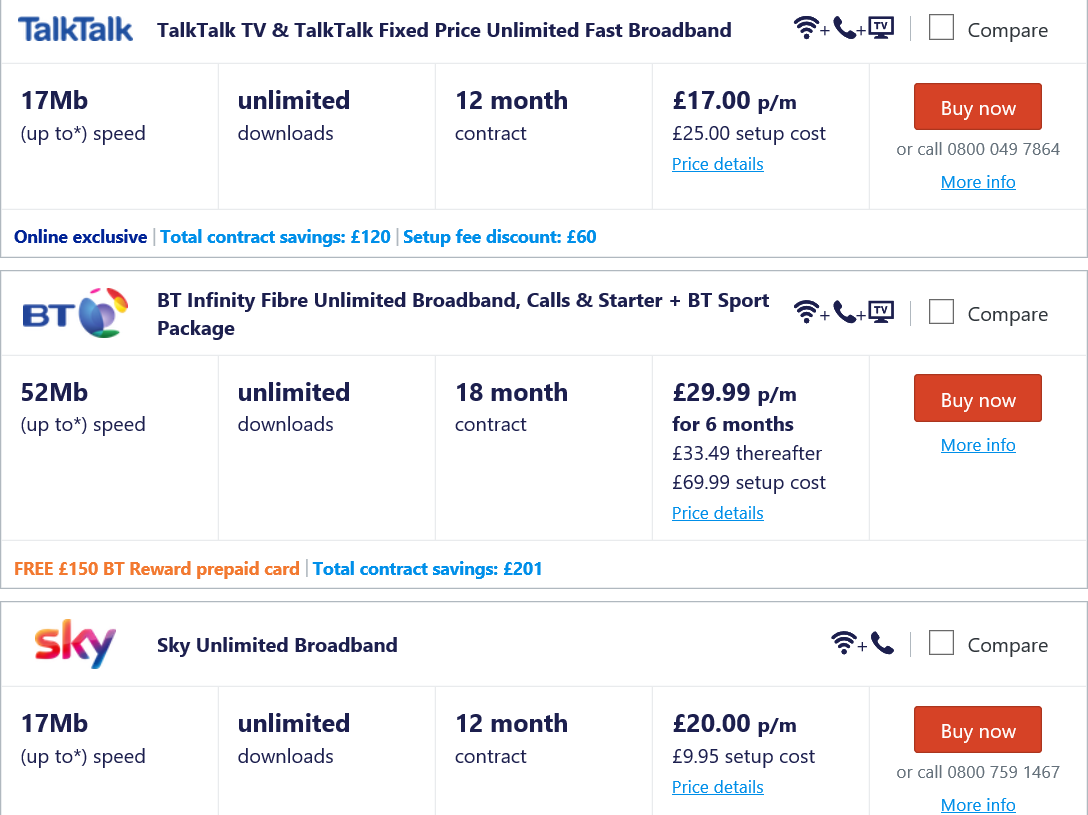
Overview
With regards to the broadband width research, I understood that it depended on the package as to how much speed would have been provided. However, some speeds were exceptionally good with 'BT' and 'TalkTalk' displaying good examples below. I understood that it depended on whether the silk mill had an Internet package and if so, to what speed would have been provided. This would therefore have had an effect on the overall loading time of the web pages both projects would have produced. This was the last stage I undertook before beginning the development/programming process.
The Collected Research

The Broadband Width Research

The Broadband Width Research Continued
The Broadband Width Research Continued
The Broadband Width Research Continued
The Development Process
Overview
After contributing the ideas and research displayed previously, I decided to then begin developing my part of the project which was for the 3D loom brief, combining this with the other developer's work once finished. This was to create one outcome that met requirements for both briefs. This outcome was to be a miniature website where users could have interacted with 3D models relating to both a loom and waterwheel whilst reading information about different model parts.
The Actual Development Processes
To view my individual development processes, please view the document supplied via the link below.
Development Document (This Stage)The Result of the Semester
Overview
The final interactive 3D model web pages at this stage of the project as well as my individual outcome before being combined with the other developer's work can be viewed below. Furthermore, as mentioned before, a more detailed process for the semester can be viewed through the provided document below.
A More Detailed Process (Document)My Individual Outcome Before Combining with the Other Developer's Work
The Final Project at this Stage
The Result of this Stage
Introduction/Overview
During the summer, I was contacted by one of the clients at 'Whitchurch Silk Mill' to ask if they could have utilised the project that myself and my group had produced during our second semester of our second year. After contacting the client, it was agreed that some changes would have had to have been made to the project before providing the finished version to the client. The current stage before the refinements had been made can be viewed previously.
Refining the Appearance of the Project
Overview
One area of the project I undertook was refining the appearance as currently it was well-structured and designed but needed to be more professional. Therefore, through code changes, I created the following outcomes for each page as will be seen below.
The Final Appearance of the Different Pages
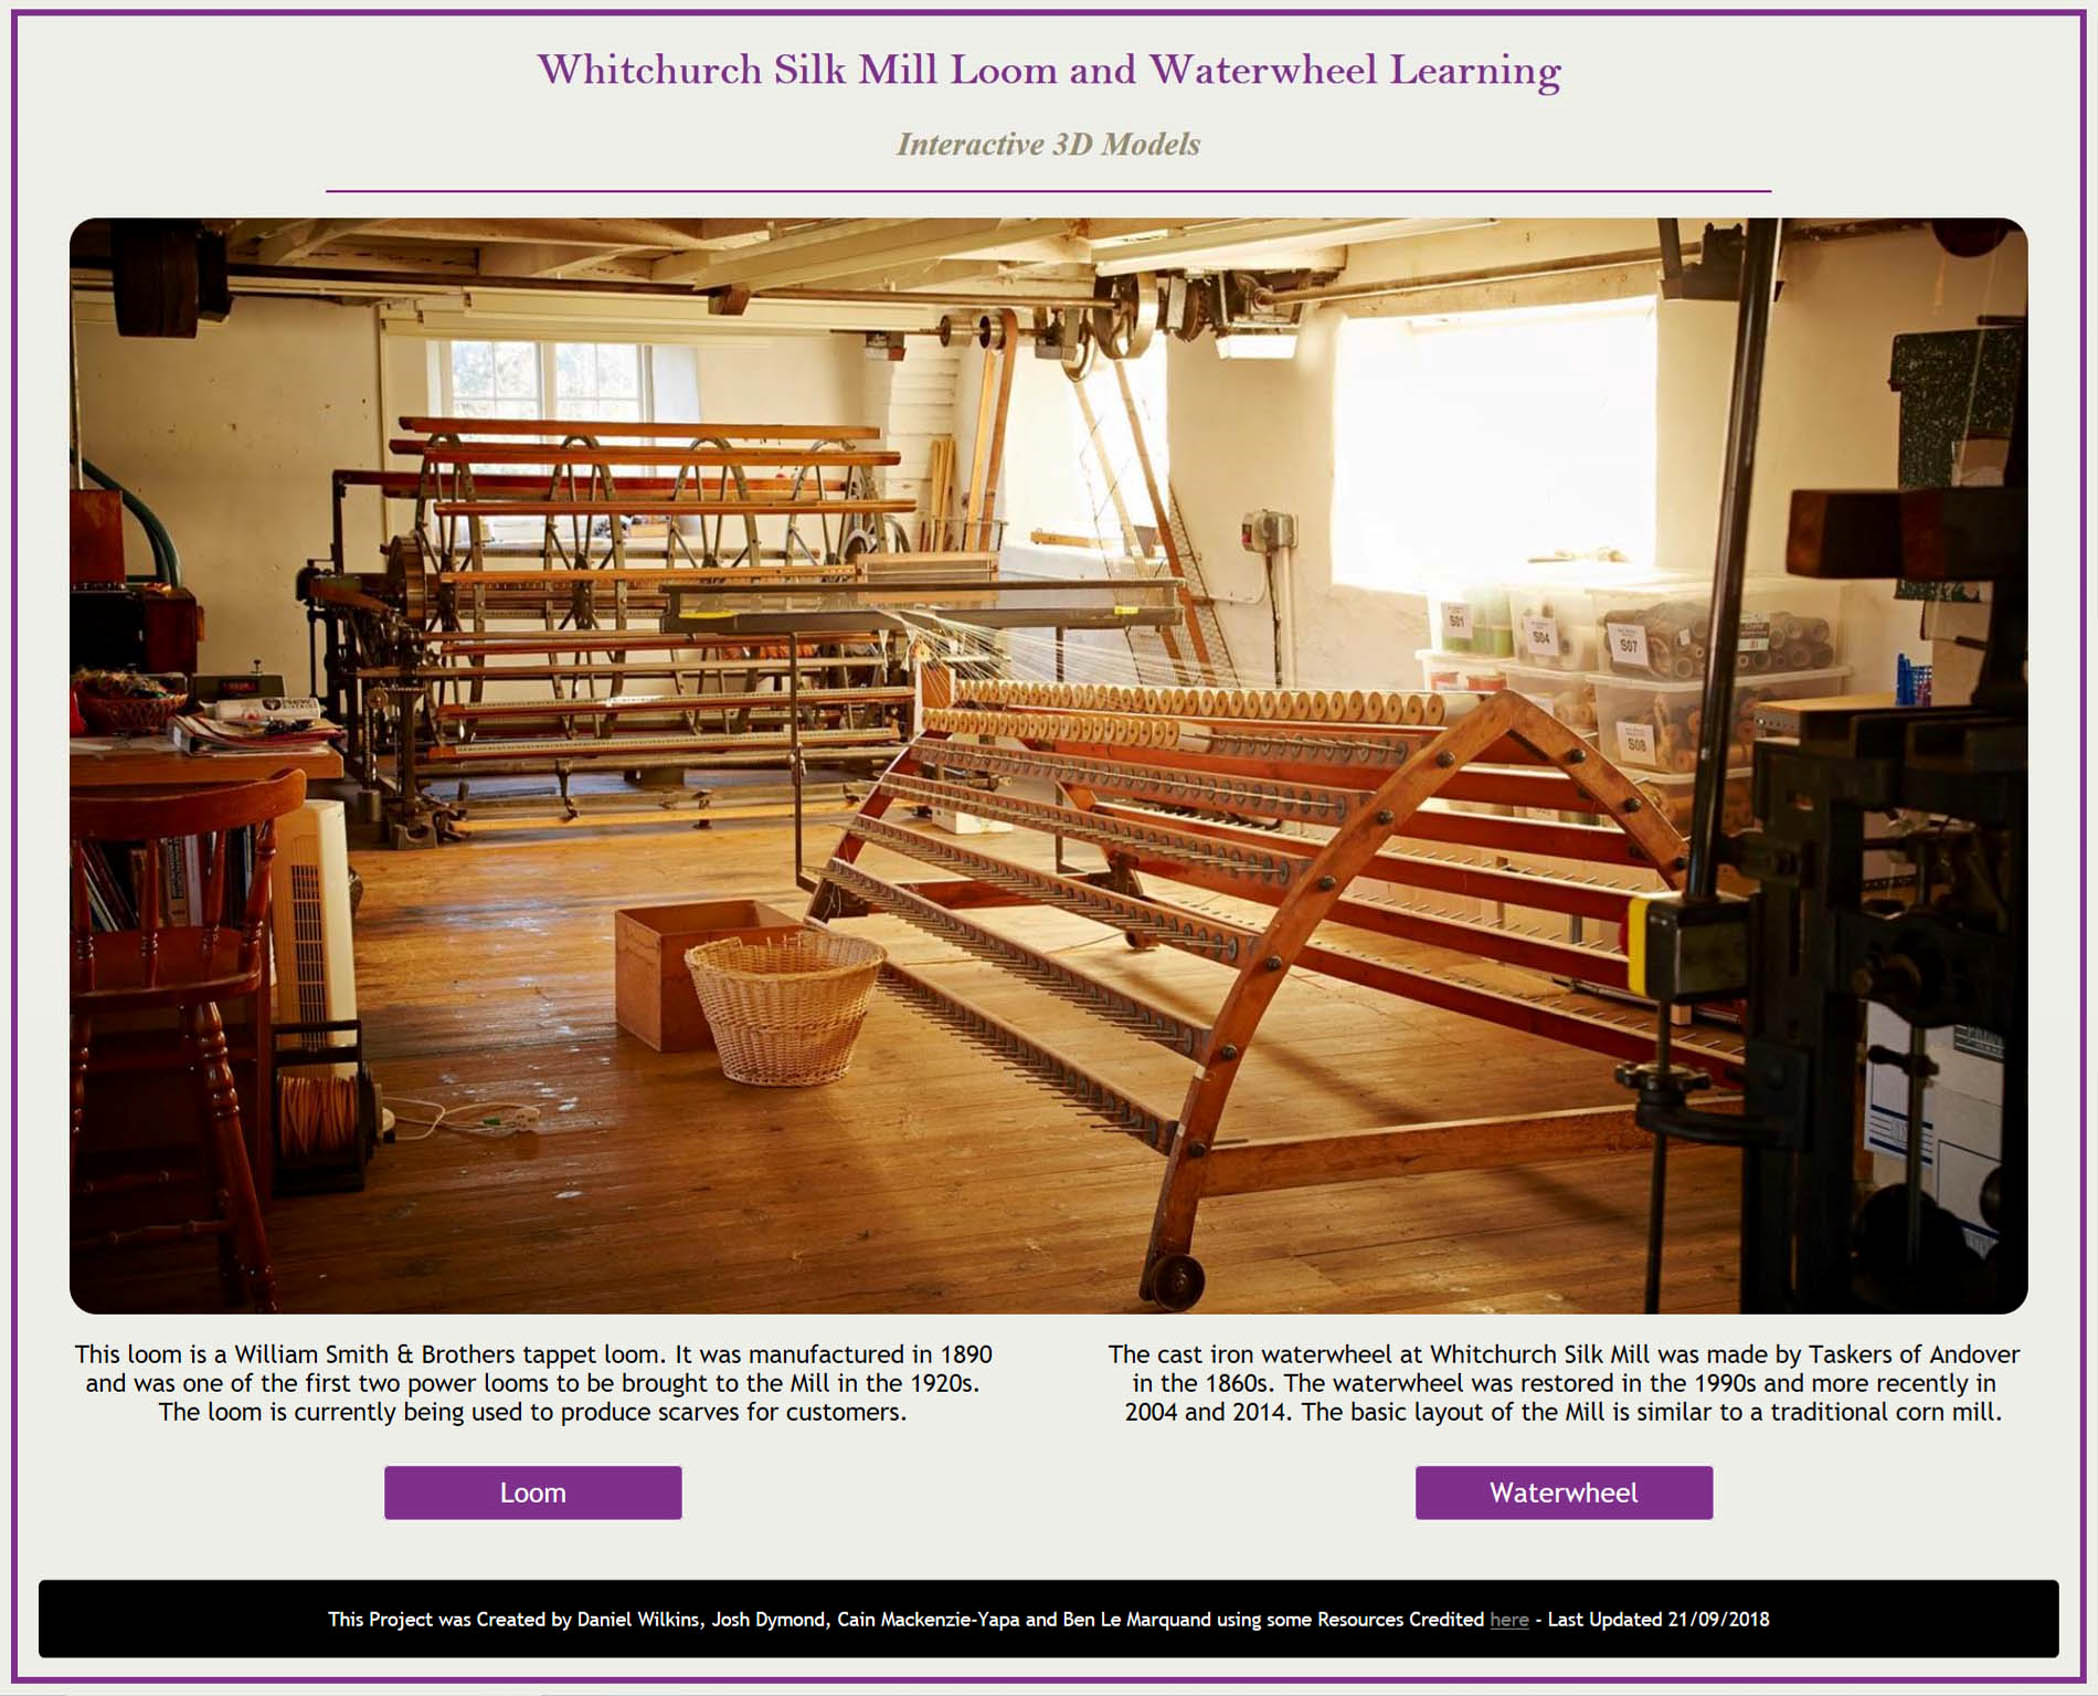
The Final Appearance of the Main/Home Page
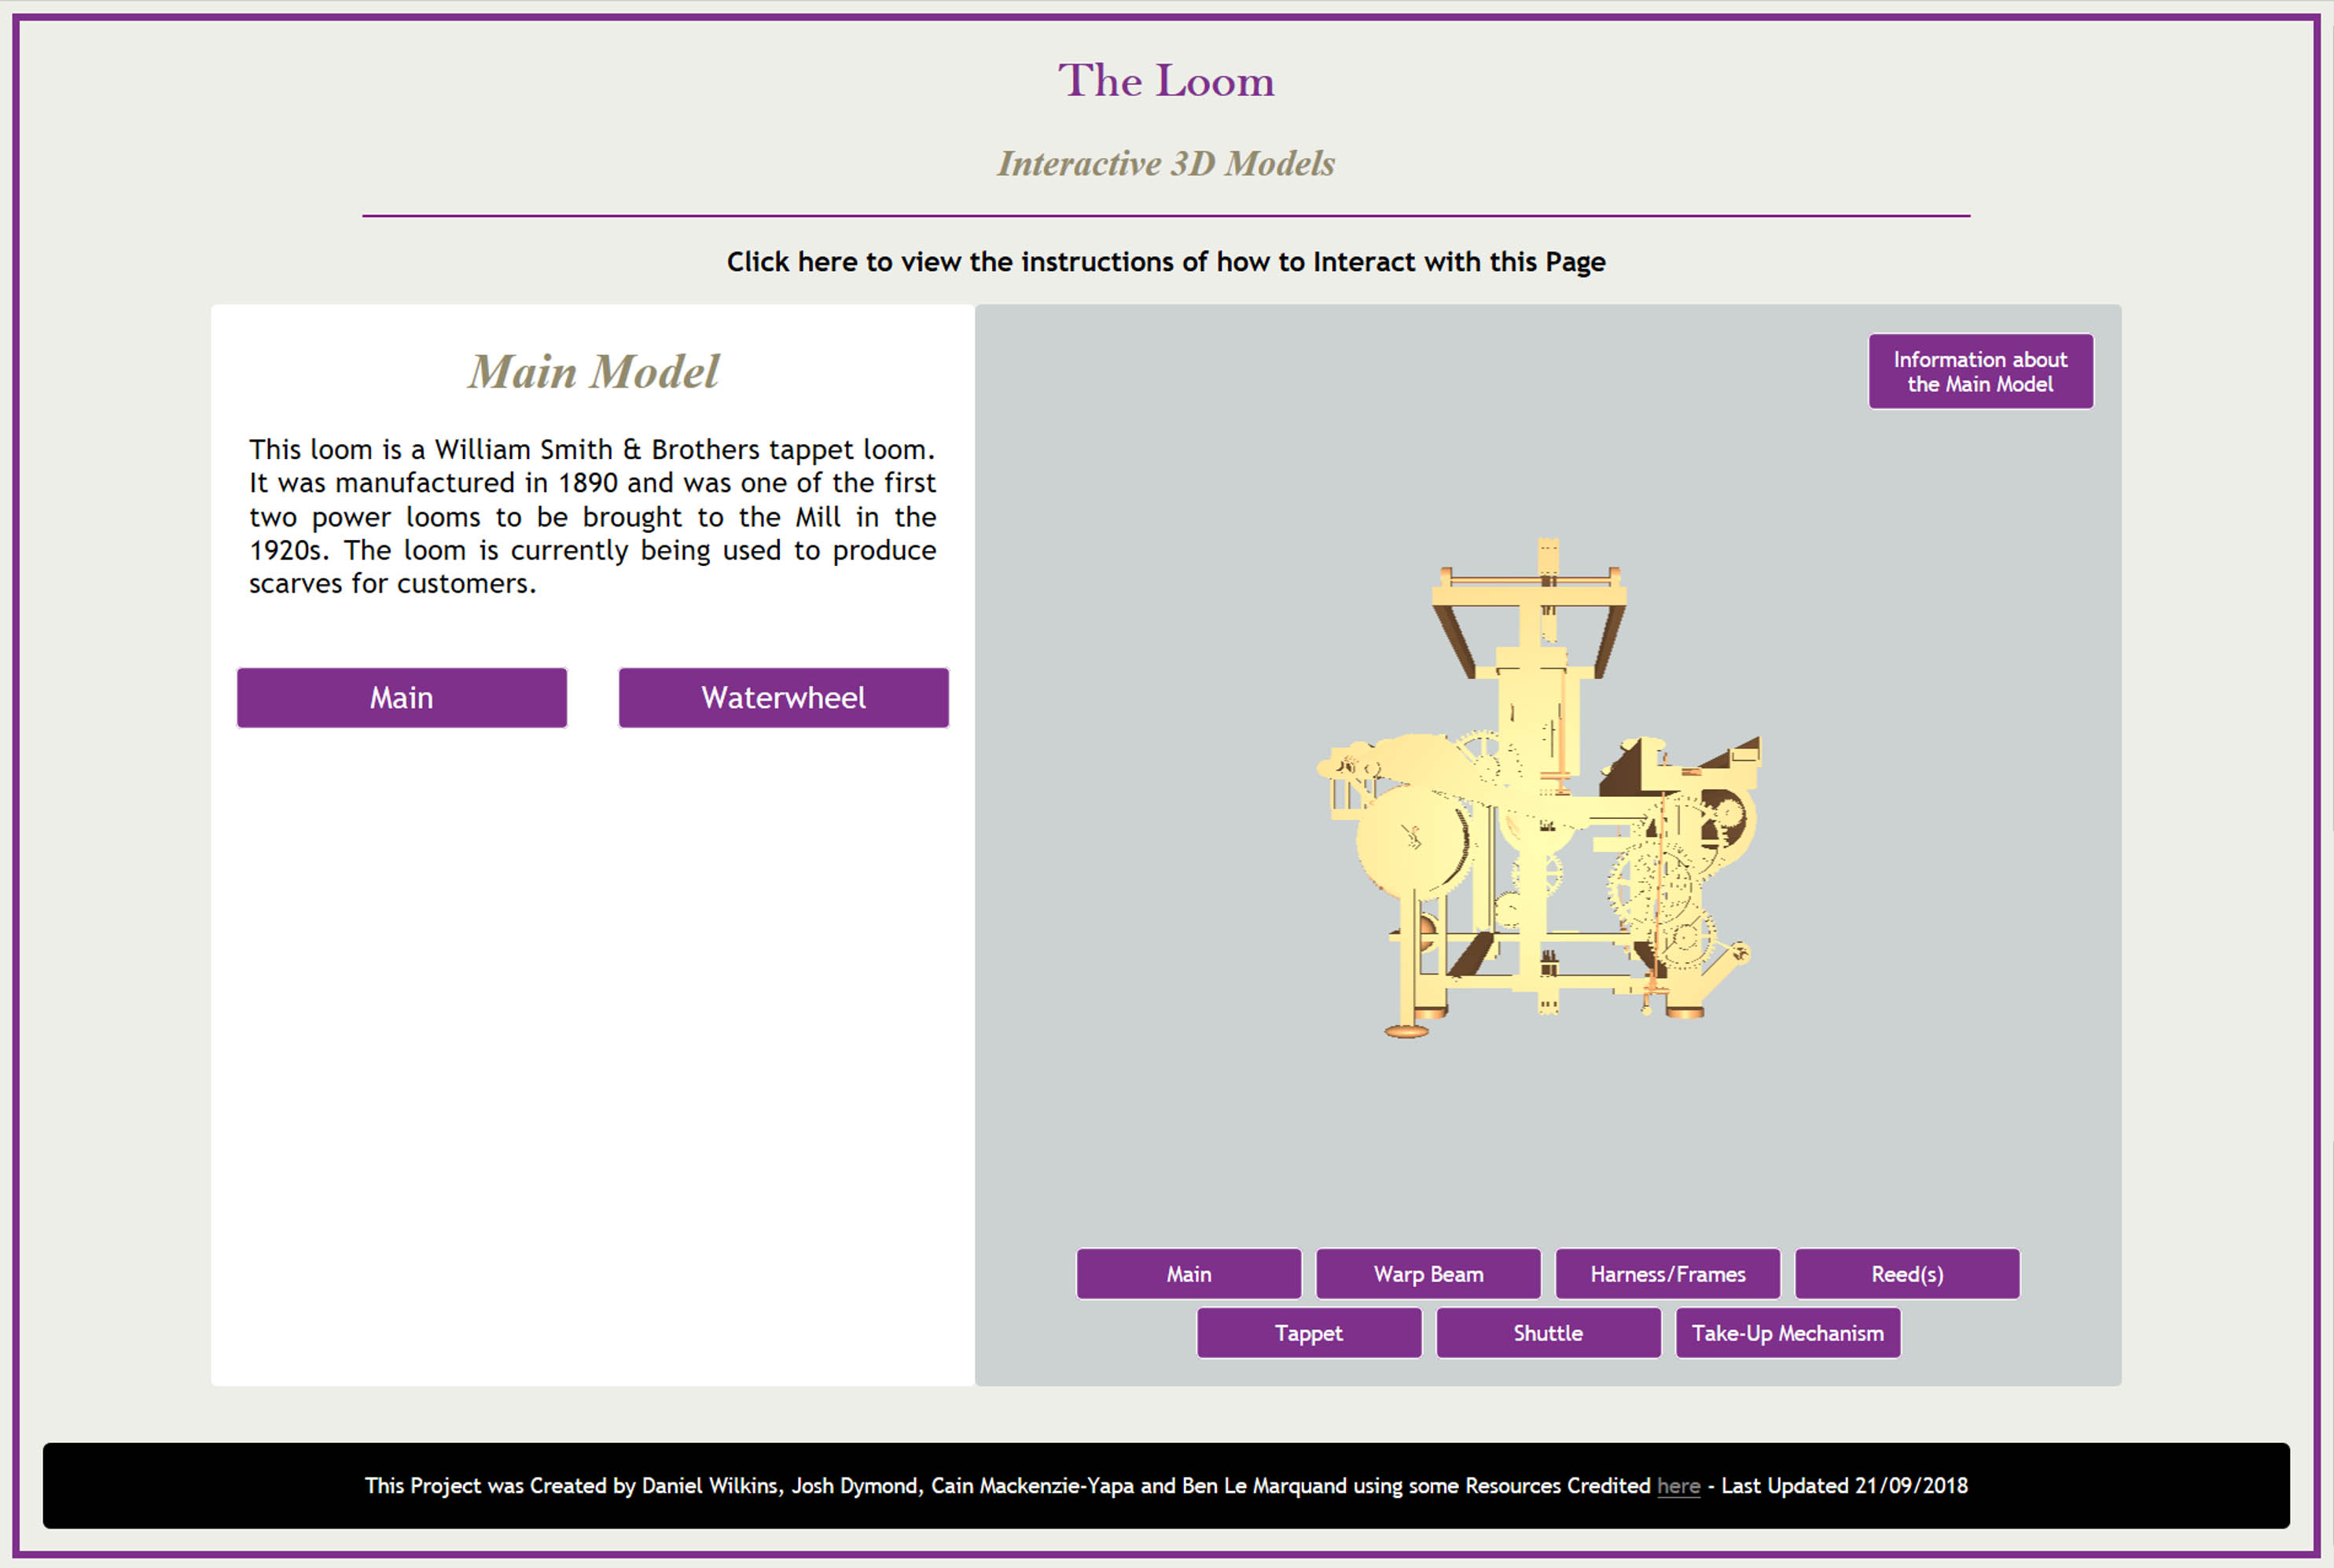
The Final Appearance of the Loom Page
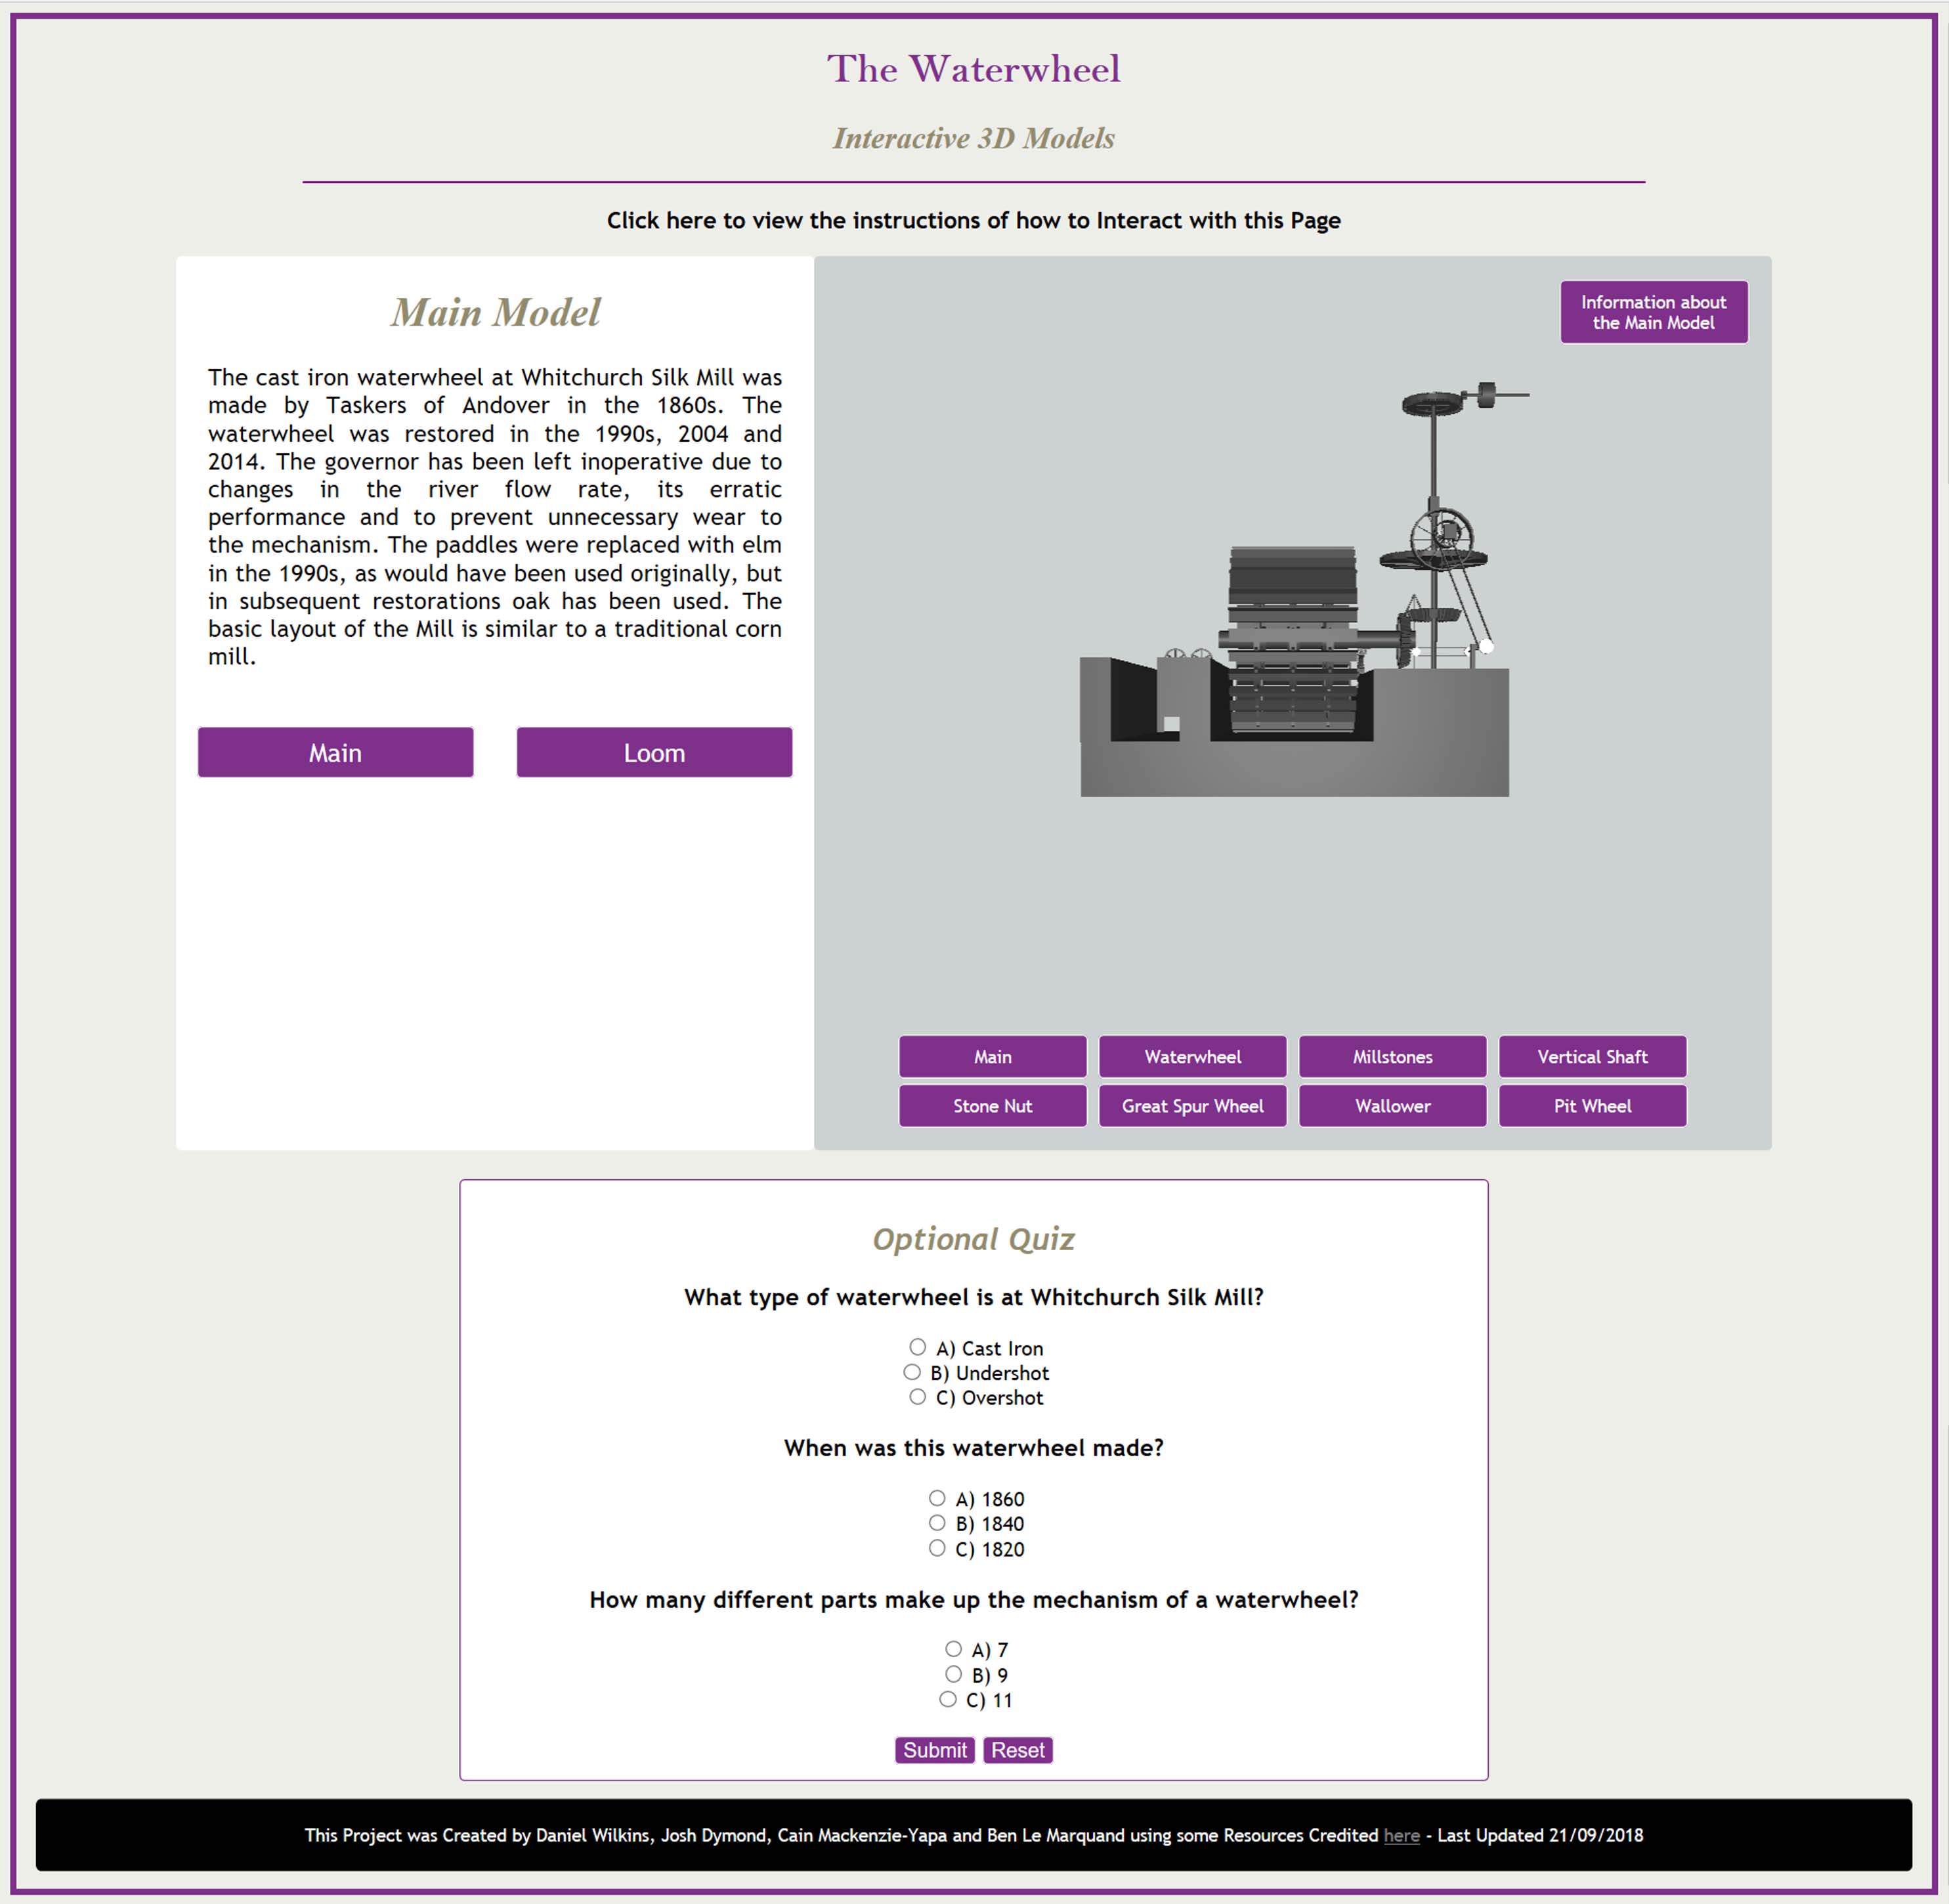
The Final Appearance of the Waterwheel Page
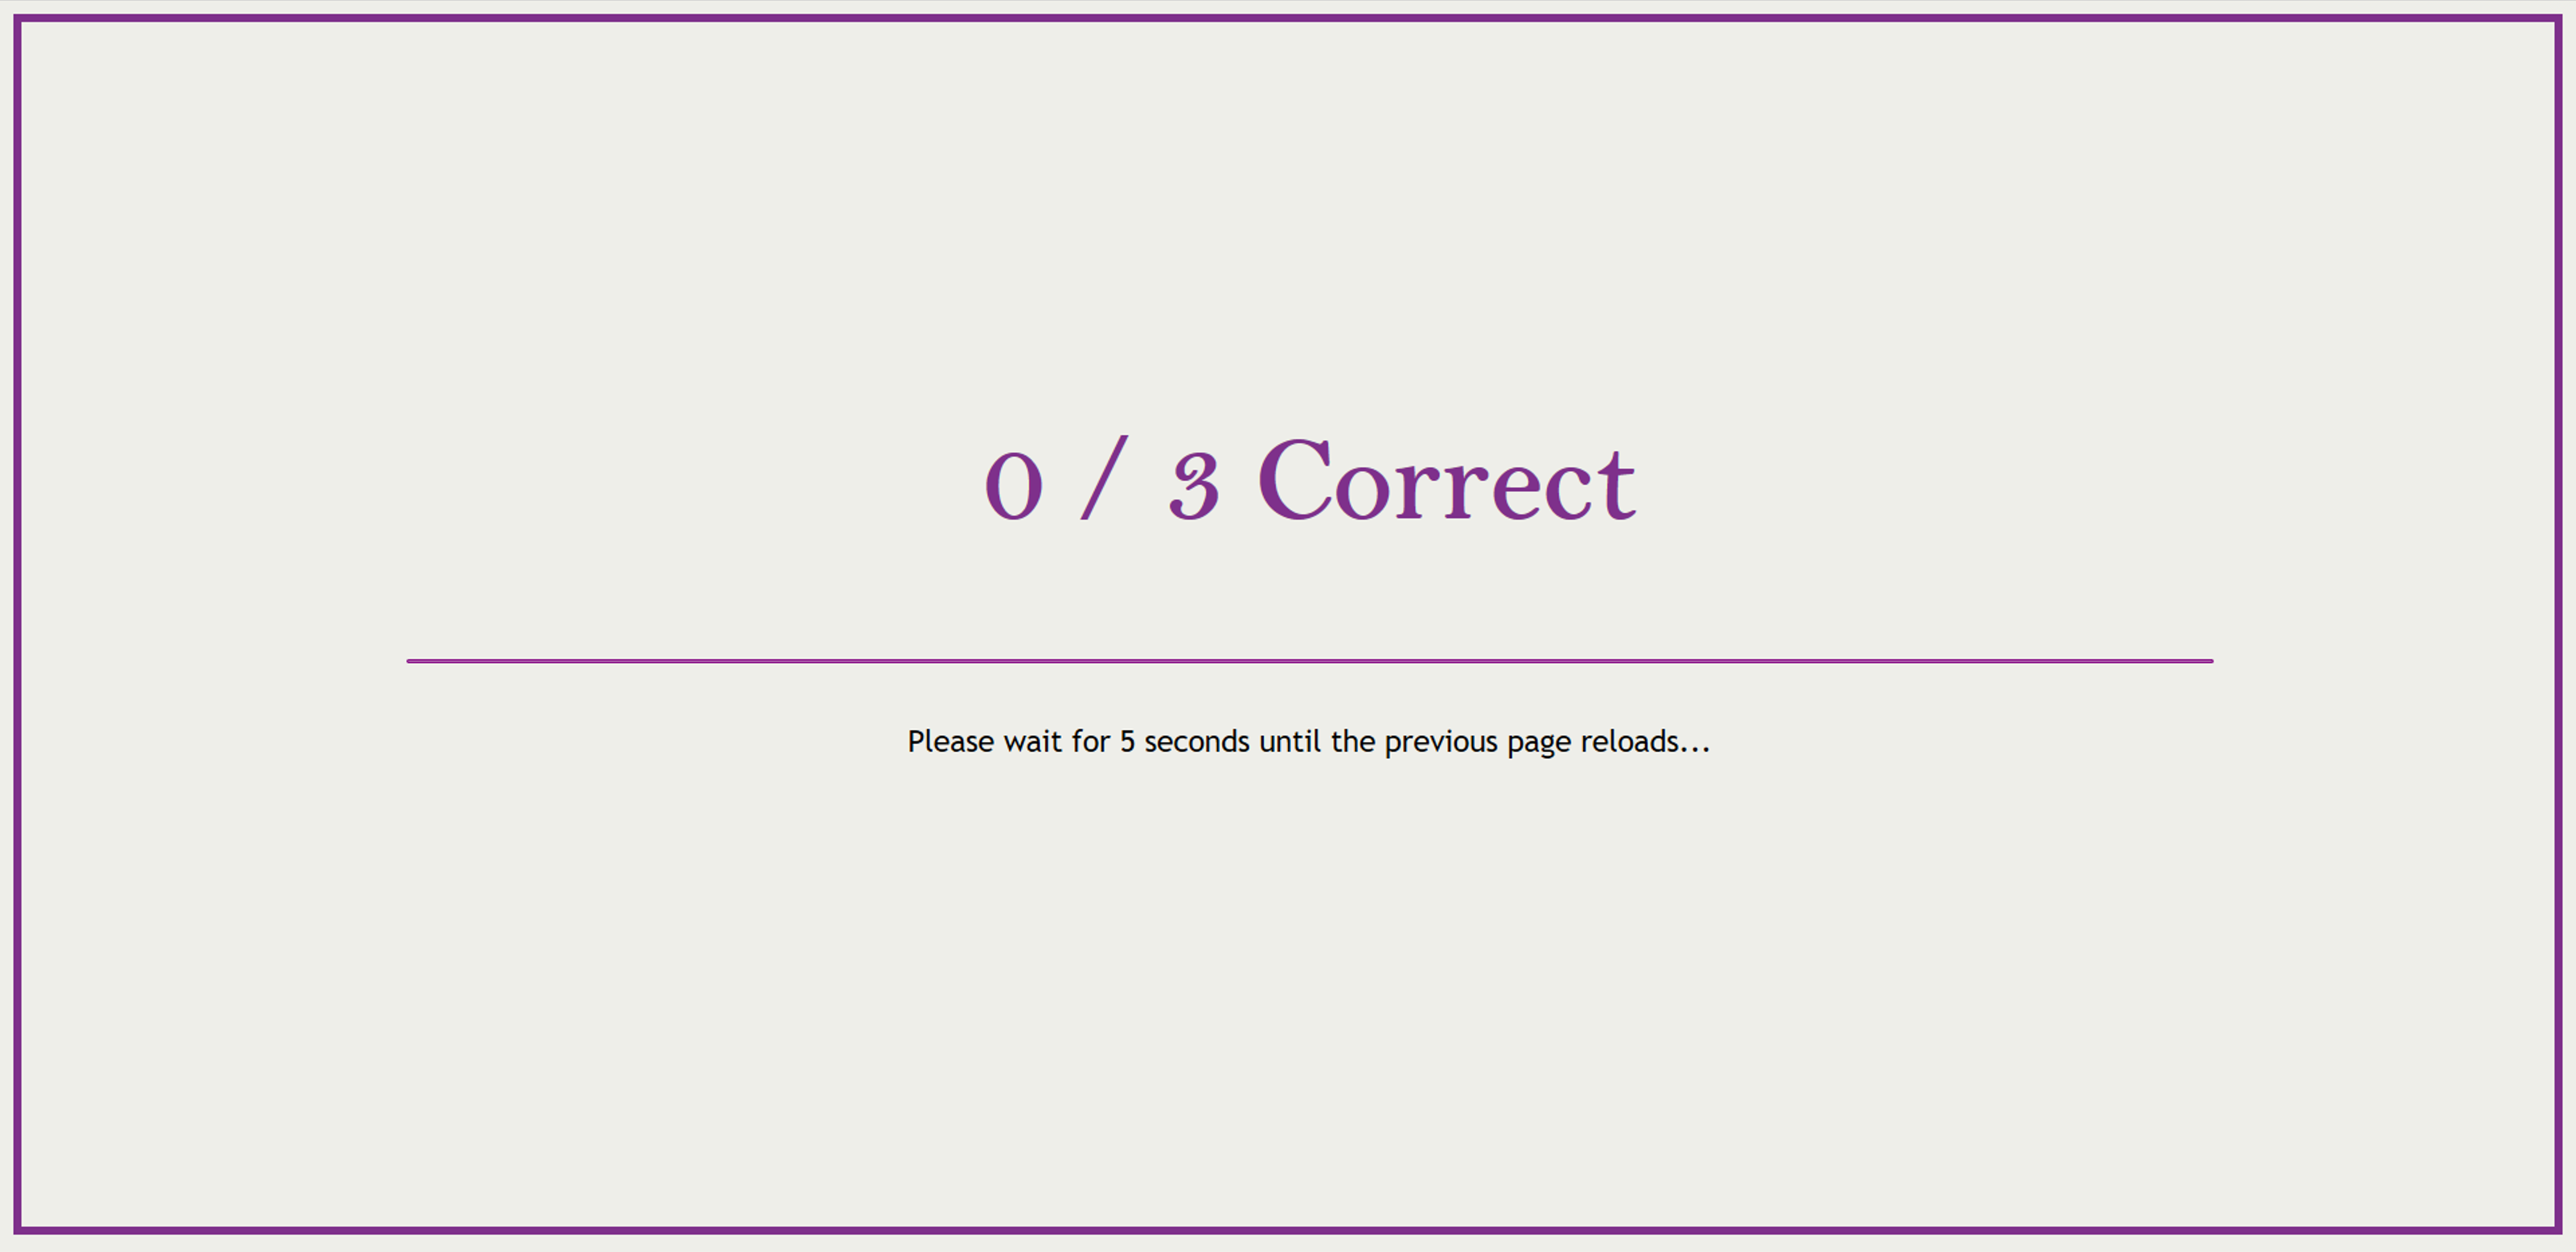
The Final Appearance of the Quiz Results Page
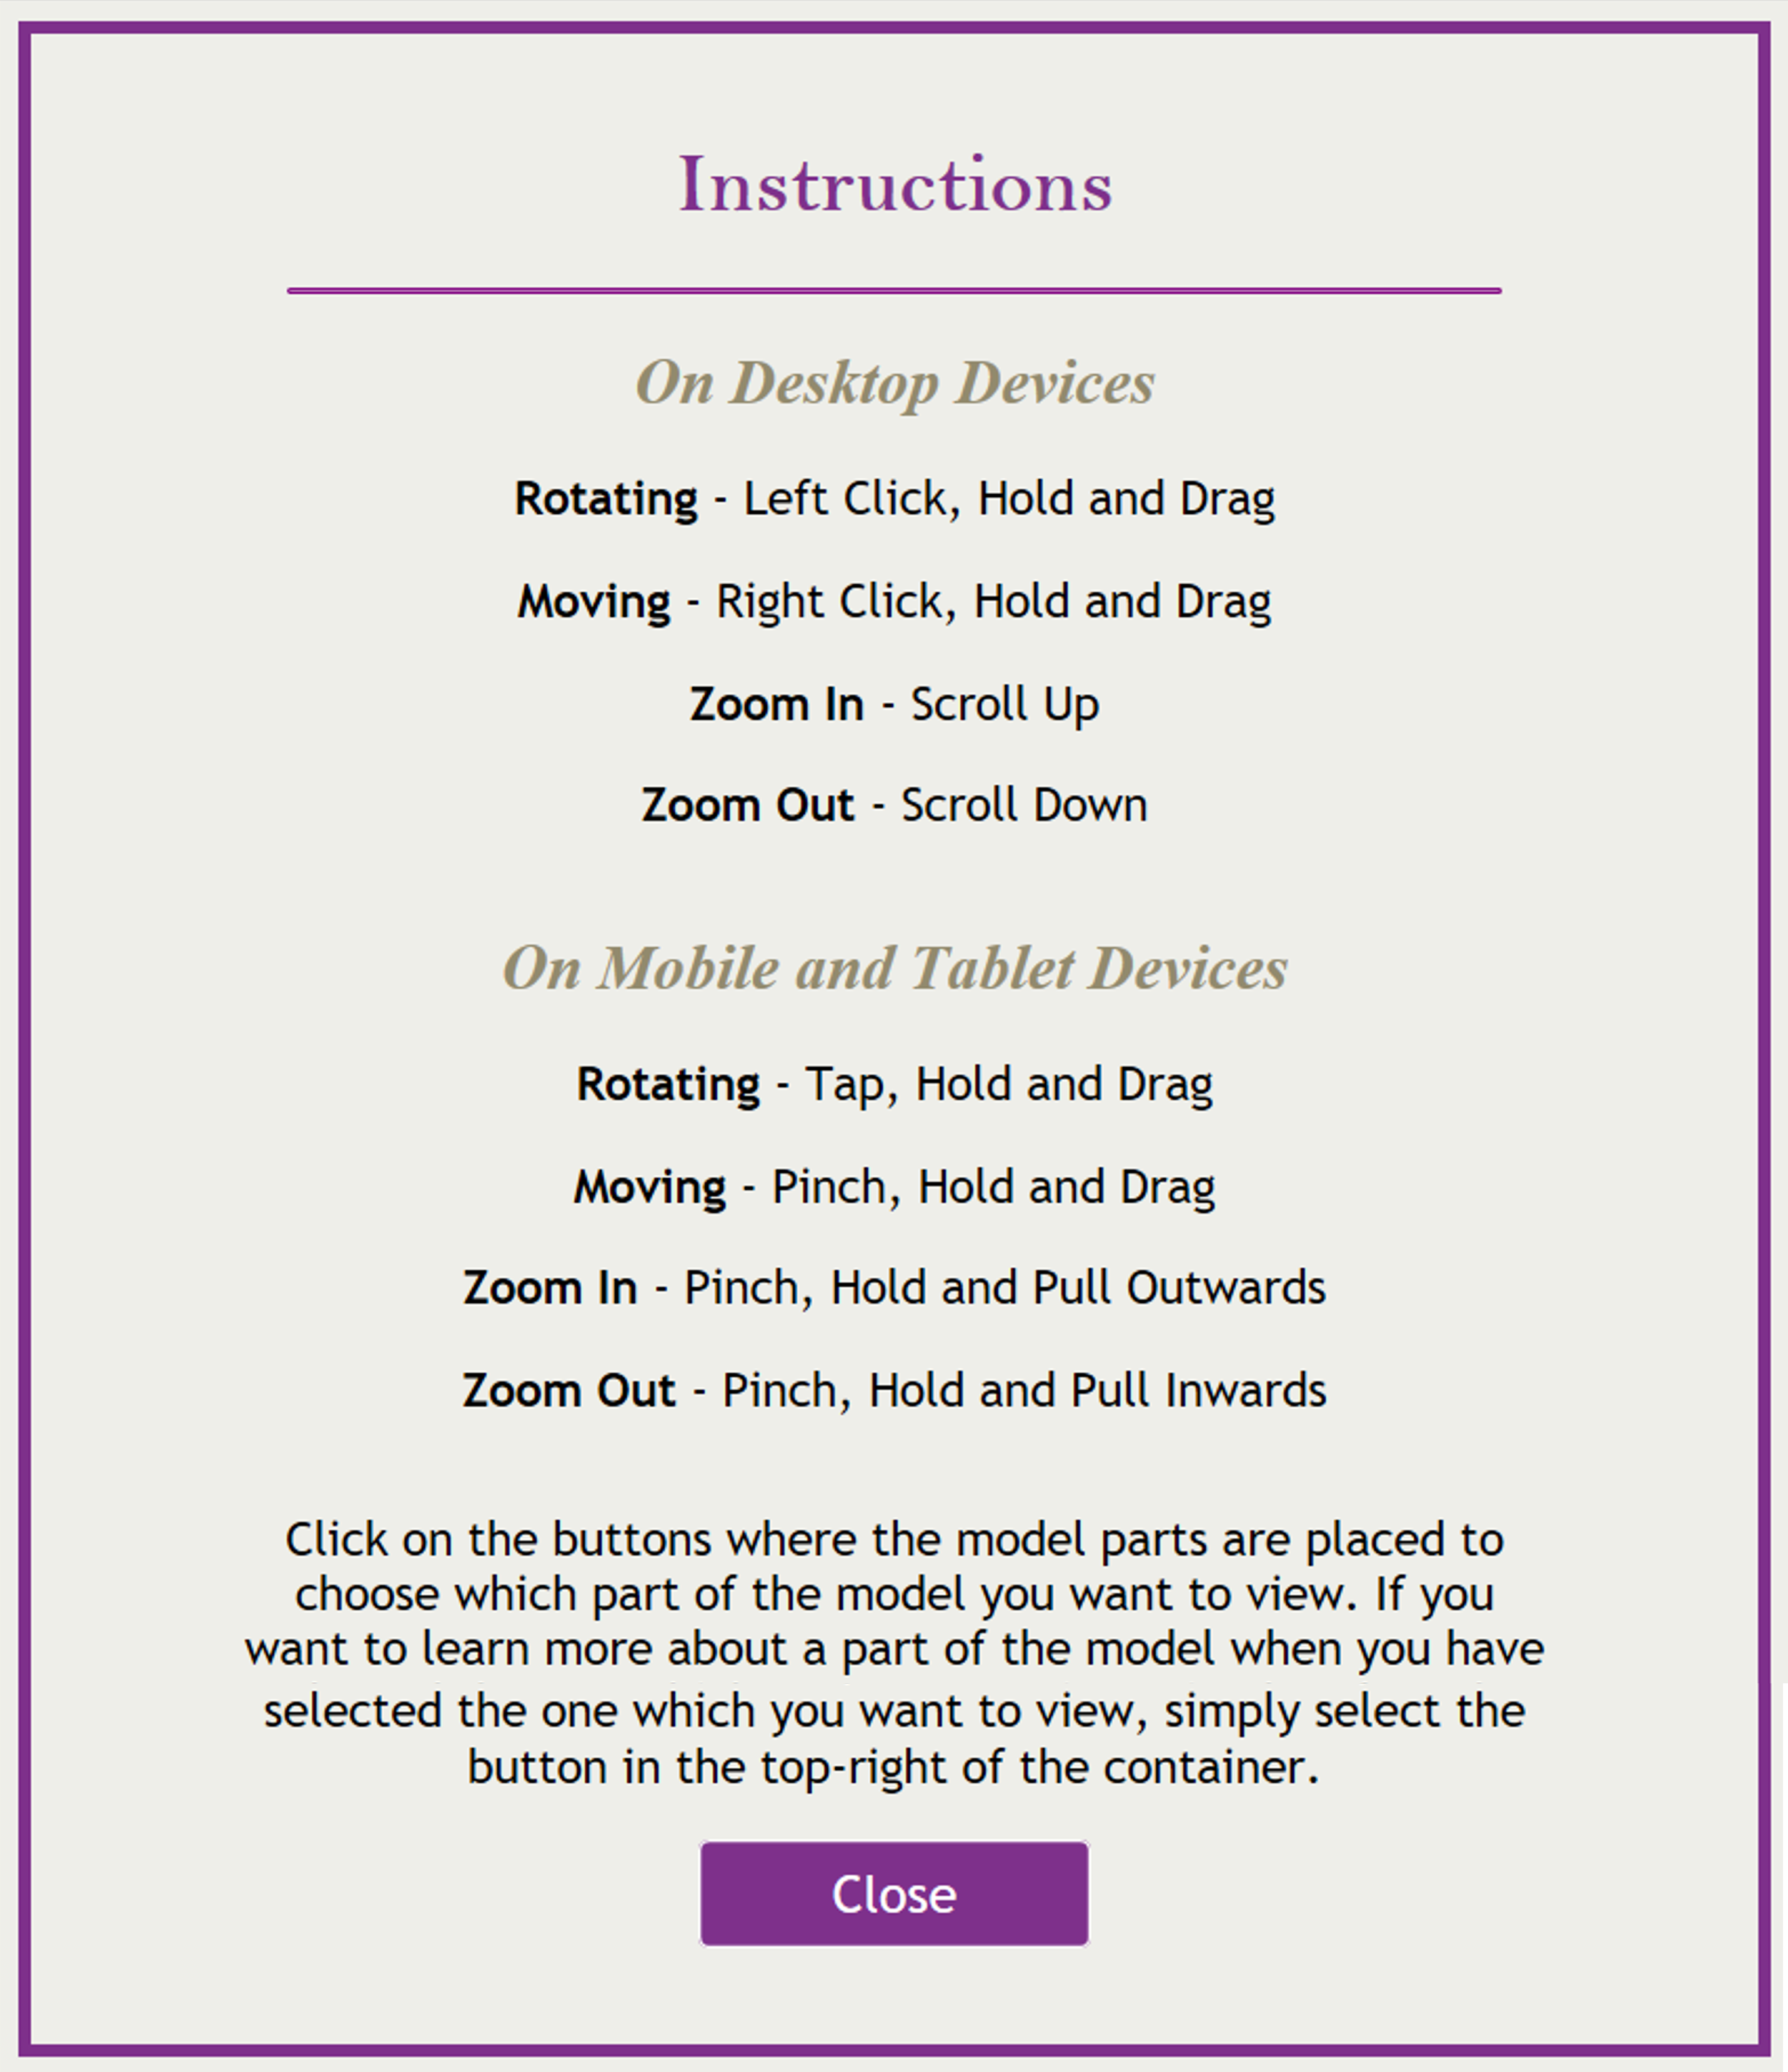
The Final Appearance of the Instructions Popup Page
Other Areas of the Project Which Were Addressed
Overview
In addition to changing the appearance of the web pages, I also managed to resolve some current issues with the project such as resizing the information 'iframe' to fit its contents on mobile and tablet devices and preventing the waterwheel models from continuously growing in size. These processes can be viewed in the development document placed below. This shows my process undertaken throughout.
Development Document (This Stage)Final Feedback and Handing Over the Project
Feedback Received
Overview
I received feedback from the client(s) regarding contact and the outcome displayed via e-mail and they were very happy with what had been completed with regards to the final outcome. This feedback can be viewed below.
Although I didn’t place the precis together, as mentioned in feedback supplied below, I did collect the majority of the information for the contents of it.
Feedback Regarding Contact
“We have been in regular communication with Daniel and his team working on the 3D Loom project for the new digital interpretation that will be installed in Whitchurch Silk Mill. Throughout our correspondence Daniel maintained a professional and polite manner to any staff member he has been communicating with, and his emails have always been clear and sincere. Daniel’s attention to detail, and especially his commitment to complying with the client’s wishes is clearly displayed within the various emails requesting information to help with the creation of the 3D Loom project.”
“I was particularly impressed that Daniel had produced a project precis for us, the client, outlining the requirements of the 3D loom brief, research (including a bibliography) and drawings, as well as possible problems and solutions that might emerge when completing the project. Based on the correspondence between himself and the Mill, I feel assured that the end product Daniel and the team have produced will be of a high standard.”
- Zoe Umpleby, 'Whitchurch Silk Mill'
Feedback Regarding the Final Outcome
“We worked with Daniel and his fellow students as part of a university project, to create digital resources for Whitchurch Silk Mill. We provided a number of briefs for the students to complete and Daniel took on the challenge to produce an interactive 3D model of our waterwheel and loom. We were very impressed with all of the work that was produced by the students through the course of the project. However, Daniel took this a step further by providing us with the finished product for which we were very grateful. Following the end of the semester, Daniel used his own free time to complete the product, so that we now have a very useful interactive model that we can use with school groups and wider audiences. Daniel was very thorough and diligent and we would be happy to work with him again in the future.”
- Lisa Gale, the Visitor Experience Manager at 'Whitchurch Silk Mill'
Handing Over the Project
Overview
As myself and the client were now content with the project and I felt that I had done everything I could with regards to making sure that the final outcome was professional and functional, it was now the time to provide this to the client(s). I therefore purchased a memory stick which I would have placed the project on and therefore give to the client(s) in order for their IT team to check and upload to their server for use in the mill. This was successfully delivered and this signified the end of the project to the client’s satisfaction.
The Final Outcome
Overview
With regards to the final outcome for this project, this is something which can be viewed at the end of this page.
Reflecting on the Project
Overview
For this project, I thought it was very successful and I was very proud of the fact that I had managed to get a 3D model to appear on a web page with controls after trying for a considerable amount of time. If I were to do this project again, I would try and implement a game aspect to the outcome, perhaps by encouraging the user to gain a high score of clicking on different points of a 3D object in a specific time period. Overall, I was pleased with the outcome(s).
From completing this project, I felt that I managed to improve my skillset as a website developer through learning ‘three.js’, using this to create web pages to hold interactive 3D models. This is something that I believe will be invaluable to myself in the future as I will be able to integrate aspects of this, where required, using the knowledge I currently have. I thoroughly enjoyed working on this project as it was within an area I enjoyed specialising in, website development, but was also something unique and something that I had never previously known about.